Saturday, November 7, 2015
3D Album
Making an Album requires lots of photos. You can use free stock photos from http://www.deviantart.com/
or your own stock of photos. It does not require much expertise and is easy to make with the end result being quite satisfactory. None of the values given here are absolute, you can make your own changes.
You can make an album like this.
Or you can make a 3D one like this.
Step 1 Open a large white document.
Step 2 : Open a new layer by clicking on the New layer button. A new Layer 1 forms.
Step 3 : Click the Rectangular Marquee tool. The Feather should be set to 0.
Step 4 : Keeping the SHIFT key pressed draw random squares like this.
Step 5 : The Foreground Color is set to Black and Background to White which is the default.
Press CTRL+BACKSPACE to fill the selections with Black.
Step 6 : After filling the selections with Black press CTRL+D to deselect.
Step 7 : Click the Rectangular Marquee.
Step 8 : Draw a selection of the first square.
Step 9 : Open your stock photo collection.
Step 10 : Open an image. Press CTRL+A (Select ALL) then CTRL+C (copy.
Step 11 : Click on this document.
Step 12 : Press CTRL+SHIFT+ALT+V to paste into the selection.
Step 13 : Press V for the Move tool. A selection appears. Reposition or resize if necessary. To resize proportionately Press SHIFT+ALT and drag a corner handle. To hide the selection Press CTRL+H. This is how you need to fill in all the squares one by one with images.
Step 14 : Click the Rectangular Marquee again.
Step 15 : Draw a selection on another square.
Step 16 : Open another image. Press CTRL+A then CTRL+C.
Step 17 : Go over to the document with the squares. Press CTRL+SHIFT+ALT+V. The image is pasted into the selection. This is how you must paste the images one by one into the squares.
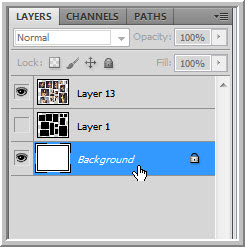
Look in the Layers palette. Each imagei s pasted is on its own layer.
All the images have been pasted into the black squares one by one.
The Layers palette looks like this. Each image is pasted into is on its own layer. It means that there will be as many layers as the number of images pasted into.
Step 18 : With Layer 13 (the last image to be pasted into) highlighted press SHIFT and click on Layer 2 (the first image pasted into).
Step 19 : All the Layers are highlighted.
Step 20 : Press CTRL+E. All the layers are combined into Layer 13. Switch off the eye icon on Layer 1.
Step 21 : Click on the Background Layer.
Step 22 : Press ALT+BACKSPACE to fill with Foreground Color which is Black.
The image looks like this.
Step 23 : Click on Layer 13 which has the images in the squares. Click on the FX button at the bottom.
Step 24 : Click on Blending Options.
Step 25 : In the Blending Options click on Inner Shadow. I will leave it at the default settings.
Step 26 : Click on Stroke. Click on Color.
Step 27 : The Select Stroke Color opens. Type in ffffff in the box at the bottom. Click OK.
Step 28 : The Color of the Stroke has been changed to White. Change the Position to Inside and drag the Size slider suitably. Since this is a large image, I have set it at 8.
Click OK.
The image looks like this. If you want you can stop here. You can make pages of albums in this way. You can also print it. If you want a 3D effect carry on.
Step 29 : Click on the Background Layer.
Step 30 : A new Layer forms above the Background Layer.
Step 31 : Switch the Foreground Color to White by pressing x on the kayboard.
Step 32 : Click the Elliptical Marquee.
Step 33 : Keeping SHIFT pressed draw random circles.
Step 34 : Press ALT+BACKSPACE to fill with Foreground Color which is now White.
Step 35 : With Layer 14, the one in which we added the White Circles highlighted Press SHIFT and click on the topmost layer.
Step 36 : All the three layers are highlighted.
Step 37 : Press CTRL+E. All the layers merge into one.
Step 38 : Go to 3D>New Shape from Layer>Sphere.
This is how the image looks.
Step 39 : Press CTRL+T. This dialogue box comes up. Click Convert.
Step 40 : A selection forms around the image.
Step 41 : Press SHIFT+ALT and drag a corner handle to make the Sphere bigger.
Press ENTER.
Step 42 : Press CTRL+J to duplicate Layer 13 to Layer 13 copy.
Step 43 : Click on Layer 13.
Step 44 : Press CTRL+T.
Step 45 : Drag down just a bit.
Step 46 : Drag down the middle handle. Press Enter.
Step 47 : Click the Add Layer Mask button. A Layer Mask forms next to Layer 13 thumbnail.
Step 48 : The Foreground Color is set to Black. Click the Gradient Tool. Click in Top Panel to bring up Gradient Editor.
Click on Foreground to Transparent.
Step 49 : Drag down at the bottom with the Gradient Tool as shown.
The finished image.
Other Photoshop tutorials are here
Labels:
3D Album
Subscribe to:
Post Comments (Atom)


No comments:
Post a Comment