Thursday, November 19, 2015
Blend If in Photoshop
The Blend if option in Photoshop blends two images without the need for complex selections or masking. I will use two free stock images to demonstrate how to use it.
I have opened this image of a tree in photoshop. This image belongs to lillyfly06-stock
Step 1 : I am dragging the clouds image onto the tree image with the Move tool while keeping Shift pressed.
This is the Move Tool.
Step 2 : The clouds cover the tree image entirely.
Step 3 : There are only layers in the layers palette. The Background is the image of the tree and Layer1 the clouds. Double click Layer 1.
Step 4 : The Layer Style dialogue box opens.
Step 5 : We are only interested in Blend If which is set to Gray. This Layer and Underlying layer below it are set from 0 to 255.
Step 6 : The Blend If also has options beside the default Gray. They are Red, Green and Blue.
Step 7 : Since the image is blue, I am selecting Blue as Blend If.
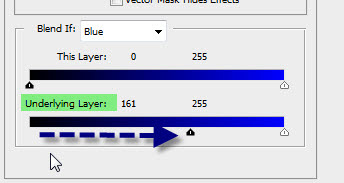
Step 8 : I am dragging the Black slider on Underlying Layer while keeping an eye on the image.
Step 9 : As I drag the slider, the tree becomes visible.
Step 10 : This is how much I have dragged the Black slider of the Underlying Layer.
Step 11 : This is how my image looks. There are come problems at right below the leaves. There are also some at the left. That has to be fixed. Click OK in Layer Styles.
Step 12 : I have zoomed into the image. It reveals that the edges where the sky and leaves meet are very harsh.
Step 13 : Double click Layer 1 to bring up the Layer Style. Press ALT and click on the Black slider. It will separate into two. Drag the left portion of the Black slider to the left while watching the image.
Step 14 : As you drag the Black slider to the right the harsh edges are removed. The leaves and sky blend perfectly.
Step 15 : I am tweaking the Black sliders a bit in the Underlying Layer. Click OK.
Step 16 : This is how the image looks.
Step 17 : Double click the Background Later. It will turn to Layer 0. Drag it above the Clouds layer i.e. Layer1. A duplicate Layer 0 copy forms.
Step 18 : The original image of the tree becomes visible.
Step 19 : Press ALT. Click the Layer Mask button. A Black layer mask forms next to the layer thumbnail on Layer 0 copy.
Step 20 : The default Foreground Color is Black and the Background White. In this case the Foreground should be set to White.
Step 21 : Press b on the keyboard to bring up the Brush Tool. To make the Brush large press ] (right bracket key) and to make it small [ (left bracket key), To make the Brush hard press SHIFT+] (right bracket), to make it press SHIFT+[ (left bracket). Here we need a large and soft brush.
Step 22 : I am painting where a portion was not looking right. Look at the image above this to see the difference.
Step 23 : By zooming into the image we can see some more places which have to be touched up, specially the tree trunk.
Step 24 : Press b to bring up the Brush Tool and paint with White set to Foreground Color.The tree trunk has been fixed, but some other problem areas remain.
Step 25 : Click on Layer 1.
Step 26 : Click on the Eyedropper Tool.
Step 27 : Click with the Eyedropper on the clouds.
Step 28 : The Foreground Color changes to the color picked.
Step 29 : Click the New layer icon and a new Layer 2 forms above the clouds on Layer 1.
Step 30 : Paint out the bits and pieces visible earlier.
Step 31 : Click with the Eyedropper on the clouds.
Step 32 : Click the New Layer icon and a new Layer 3 form.
Step 33 : The imperfections in the sky have been taken care of.
Step 34 : Click the Eyedropper tool again.
Step 35 : Click somewhere in the Foreground with the Color Picker.
Step 36 : Click on the New Layer icon. A new Layer 4 forms.
Step 37 : Press b to bring up the Brush Tool. In the top panel lower the Opacity to 50%.
Step 38 : The bluish shade in the foreground has been painted out. That is all. The tree is clearly visible and the sky behind has been filled with clouds. I don't think that was difficult.
Other photoshop tutorials are here.
Subscribe to:
Post Comments (Atom)


No comments:
Post a Comment