Sunday, November 15, 2015
Blending with Layer Mask
Sometimes it pays to revisit the Layer Mask in Photoshop. You can blend two images seamlessly together with a Layer Mask. No special expertise is required. You can also do it in any version.
Here are two free stock images I found on http://www.deviantart.com/#. You can use any image of your own.
Step 1 : Drag the second image over the first till it covers the image below entirely. The Background is the first image and the second image is on Layer1.
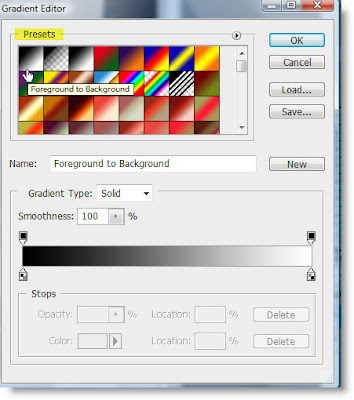
Step 2 : Click the Gradient Tool from the fly out, then click on top to bring up the Gradient Editor.
Step 3 : The Gradient Editor opens. Click the first Gradient in the top row to select it.
Step 4 : Press Shift and drag from bottom to top. You will be able to drag up in a straight line.
Both the photos have been blended seamlessly. It works for any two images.
You have to use the Move Tool to drag one image on top of the other.
Step 1 : I have opened another two images in Photoshop. Use the Move tool to drag one image onto the other.
Step 2 : After dragging, I find that the girl's image is smaller than the one of the highway. This can happen.. Press CTRL+T. Corner handles appear around the image of the girl.
Step 3 : Press SHIFT+ALT and drag any corner handle. The image will increase in size proportionately till it covers the one in the Background. After resizing press Enter.
Step 4 : Look in the Layers palette. The girl's image is on top (Layer1) and the highway the Background.
Click the Layer Mask icon at the bottom of the Layers palette and a Layer Mask forms next to the Layer thumbnail on Layer 1.
Step 5 : Click on the Gradient Tool and then at the top bring up the Gradient Editor.
Step 6 : Click the first Preset.
Step 7 : With SHIFT key pressed drag the Gradient Tool straight up.
This is how the image looks.
Step 8 : Make sure that the Foreground Color is set to Black. If not press 'x' and then 'd'.
Step 9 : Click the Brush Tool.
Step 10 : Click on Brush in the top panel. From the drop down set the Hardness to 0. The Master Diameter can be changed with the [ (left bracket key) and the ] (right bracket key). The left bracket decreases the size of the brush tip and the right bracket increases it.
Step 11 : Make the Brush tip small by pressing the [ (left bracket) as you get near the face. If you accidentally wipe away a portion, change the Foreground to White and paint back the mistake.
And this is my finished image.
Other photoshop tutorials are here.
Subscribe to:
Post Comments (Atom)


No comments:
Post a Comment