Tuesday, November 24, 2015
Brushes Installation in Photoshop
While photoshopping you may need free stock images and brushes etc etc. A great source for free stock images and Brushes is http://www.deviantart.com/# . The images are of high resolution so are the Brushes. All you have to do is register. Registration is free.
If you click the link you will be taken to the site.
On the left side you will find the Stock Images. Click on it.
You will be taken to this page.
Note that there is a search box at the top. I have typed in 'women'. Let us see what it brings.
It brings up these two Brush sets.
Here is brush set. You will find it here.
On the left you will find the download link. Click on it to download the Brush.
This dialogue box opens. Click on Save.
Make a folder and save it on your computer. Do not save it on the drive where your operating system (OS) is on. Save it to any other drive. Since I have already downloaded this Brush, I will use another Brush to show you how to install it in Photoshop.
Step 1 : Click the Download button.
Step 2 : The Brush has been downloaded. It is rar file. Sometimes Brushes are also in zip files.
Step 3 : Right click it. From the drop down menu which opens click on 'Extract here'.
This is the Brush. It is in a file called abr. All Brush files look the same, but have different names.
Step 4 : Right click the Brush and click on Copy.
Step 5 : My OS is on the C drive of my computer. I have clicked on the C drive.
Step 6 : Clicking on the C drive brings up the Programme Files.
Step 7 : Clicking on Programme Files brings up the Adobe folder. Click on it. The Photoshop programme is usually within it.
Step 8 : Clicking on the Adobe folder brings us to the Photoshop programme. I am using PS CS4. If you are using any other version it does not matter. The process is the same. Click on the Adobe Photoshop.
Step 9 : Clicking on Adobe Photoshop brings up these files. Click on Presets.
Step 10 : Clicking on Presets brings up the Brushes Folder. Click on the Brushes folder.
Step 11 : The Brushes folder opens. Right click. Click on Paste.
The Brush has been installed and is ready for use.
Step 12 : Open a New White Layer in Photoshop
Step 13 : Click the New Layer icon in the Layers palette and a new Layer 1 forms.
Step 14 : Click the Foreground Color to bring up the Color Picker. Click on a Green shade from the Spectrum. Click OK in the Color Picker.
Step 15 : Click on a Green Shade. Note that the Spectrum has tiny sliders which can be moved up or down to choose colors. Click OK. If you want the exact shade type '4ee656' in the box at bottom to left of 'K'.

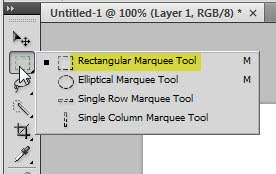
Step 16 : Click the Rectangular Marquee Tool.
Step 17 : Draw out a selection like I have done. You don't have to be too exact.
Note that the Foreground Color is the shade of Green picked earlier.
Step 18 : Press ALT+BACKSPACE. This will fill the selection with the Green shade. Press CTRL+D to deselect.
This is how the Layers palette looks. Layer 1 shows the green fill you just did.
Step 19 : Click the Type Tool and then the Horizontal Type Tool.
Step 20 : Click on the top panel where the small white arrow points to see the fonts available. Look to the right and you will find that it is set to 24 points i.e. the size. To change the size of the Text just type in a figure into the box.
Step 21 : Set the Text Color from the small Black box in the top panel.
Step 22 : Clicking on the box brings up the Select Text Color. It works exactly like the Color Picker. I have chosen the same shade of Green. Click OK.
The Text color changes to the color picked.
Step 23 : Draw out the Text Box by dragging with the Text Tool. Select a font.
Step 24 : I have typed in my Text. I have used Impact as the font. You will find it in all versions of Photoshop. You can choose any font. After Typing out your Text, press enter to commit. Then Press CTRL+T. A selection will form around the Text. Press SHIFT+CTRL and drag the letters up. It will look better.
Step 25 : With the Type Tool selected (click to select) highlight the middle word.
Step 26 : In the top panel click this icon.
Step 27 : This will bring up the Edit Text Box. Reduce the Vertical Scaling to 50 %.
Step 28 : You can either press Enter or click the Tick mark in the top panel to commit the Text.
This is how the Text looks.
Step 29 : Right click the Text Layer and from the pop up menu click on Rasterize Type.
The Text has been rasterized.
Step 30 : Click the New Layer icon and a new Layer 2 forms.
Step 31 : Click the Brush Tool.
Step 32 : Click the small square icon on the top panel at right, to bring up the Brushes. The Brushes panel opens.
Click the tiny black arrow where the red arrow points to.
Step 33 : Clicking on the arrow, brings up the Brushes available, both built in and downloaded ones, if you have downloaded them as I had instructed.
Step 34 : Here is the Brush I asked you to download. Click to select it.
Step 35 : This dialogue pops up. Click on OK.
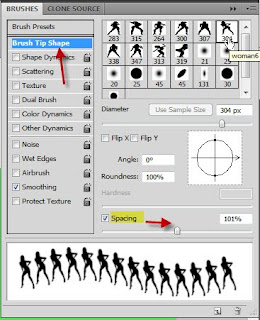
Step 36 : The Brushes change. Click on a Brush to select it. Next click on the 'Brush Tip Shape'. Lastly drag out the Spacing slider till the tip separates as shown.
Step 37 : You can see how the Brush tip looks like. Click once with the Brush.
Step 38 : Click the New Layer icon and a new Layer 3 forms.
Step 39 : Click on the Foreground Color. This brings up the Color Picker. Choose a different shade. You can see the shade I have picked. Click OK in the Color Picker.
Step 40 : Now click again in the top panel panel i.e. on the Brushes icon and choose a different Brush. Again click on Brush Tip shape and drag the Spacing slider till the tip separates as shown.
Step 40 : Click once with the Brush. This is how you do it. JUST REMEMBER. MAKE A SEPARATE LAYER FOR EACH BRUSH. This is important. Should you not like a brush later you can simply delete the layer. Your composition then remains unchanged save for the Brush you remove. You can use any number of brushes and any color too.
Step 41 : I have changed the color of the Brush. It looks better.
Step 42 : Click on the Type Tool again.
Step 43 : Click in the top panel and choose a different type. I have chosen Clementine Sketch. It is not included in Photoshop. You will find it here.
Step 44 : I have typed out my Text. It can't be seen. This is because the Color of the Text and the Background is the same. Click the Tick mark in the top panel.
Step 45 : Click the Add Layer Styles button. From the pop up click on Drop Shadow.
Step 46 : In the controls of the Drop Shadow reduce the Opacity to 50 %. Click Ok.
This is how the Font looks.
Step 47 : Should you wish to change the Font double click the Text icon thumbnail.
The Text is immediately highlighted.
Step 48 : Click on the Fonts in the top panel and choose another one.
The Font has changed. You have to click the Tick mark in the top panel to make the change. This is how you can go about creating your own poster. Experiment as much as you can. You will be amazed at the effects you can get.
That is all. Other Photoshop tutorials are here.
Subscribe to:
Post Comments (Atom)


No comments:
Post a Comment