Friday, November 6, 2015
Color Shading Action
This is another tutorial on making subtle shifts in tones in an image. I will be using Adjustment Layers, Gaussian Blur and desaturation besides other tools in photoshop. I will also turn this into an action so you can run it whenever you want to on other images without having to go through all the steps again.
This is the effect I intend to create.
I will be using this free stock image. You will find it here
It belongs to Adella
Step 1 : After opening the image in Photoshop go to Window>Actions.
The Actions dialogue box opens. Your version of Photoshop will have its own actions. Here we will be creating one of our own.
Step 2 : Click the Create new action icon.
Step 3 : The New Action dialogue box opens.
Step 4 : Give the Action a name. I have named it Green Blush. Click Record for photoshop to begin recording.
Step 5 : The Record button lights up.
Step 6 : Press CTRL+J to duplicate the Background Layer. Press CTRL+SHIFT+U to desaturate.
Step 7 : Go to Filter>Blur>Gaussian Blur.
Step 8 : Set a Radius of 1.5 in the Radius. Click OK.
Step 9 : Change the Blend Mode to Color.
The image looks like this.
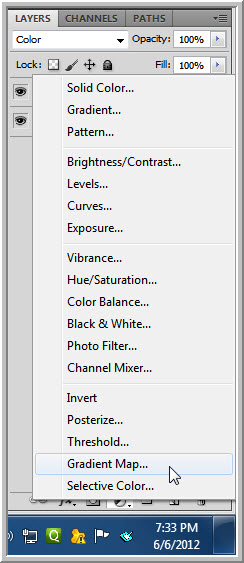
Step 10 : Click the Add New Fill or Adjustment Layer button.
Step 11 : Click on Gradient Map from the pop up menu.
Step 12 : Click where the arrow points to open the Gradient Editor in the Gradient Map.
Step 13 : Click on the Orange, Yellow, Orange Preset.
The image looks like this.
Step 14 : Drop the Opacity of the Layer to 50% by dragging the slider.
The image looks like this.
Step 15 : Make another Adjustment Layer. This time click on Posterize from the pop up menu.
Step 16 : In Posterize, I have left the Levels at the default 4.
Step 17 : Drop the Opacity of the Layer to 50%.
The image looks like this.
Step 18 : With the Posterize 1 Layer highlighted, press SHIFT and click on Layer 1.
All three layers are highlighted.
Step 19 : Press CTRL+G. All the 3 layers are now grouped into Group 1 Layer. The Blend Mode is set to Pass Through. This Blend Mode appears automatically in case of a Group Layer.
Step 20 : Change the Blend Mode to Soft Light and drop the Opacity to 85%.
Step 21 : Click the New Layer icon. A new layer 2 forms above Group 1 layer.
Step 22 : Switch the Foreground Color to White by pressing x on the keyboard or use the small bent arrow. Press b on the keyboard for the Brush Tool or click on it from the flyout.
Step 23 : Click in the top panel to open the Brush controls and set the Hardness to 0. Instead of setting the Size of the Brush from here, use the [ ] (left and right square bracket keys). [ will decrease the size of the Brush and ] will increase it.
Step 24 : make the Brush fairly large and click twice with it.
Step 25 : Change the Blend Mode to Overlay.
Step 26 : Click the Stop button in the Actions palette. The recording is complete. The Action can now be reused.
Step 27 : Scroll down in the Actions palette. The Green Blush Action just created is there.
The finished image.
I have opened another free stock image. You will find it here
Step 28 : Click on the Green Blush Action and click on Play.
The image after running the Action.
Other photoshop tutorials are here
Subscribe to:
Post Comments (Atom)


No comments:
Post a Comment