Wednesday, November 11, 2015
Darkening Backgrounds
A dark background helps the eyes to focus on the subject. But this is not always the case and sometimes beyond control. You can darken the background or parts of an image you do want attention to be given to with an adjustment layer. It can be done in any version of photoshop.
This is the effect I will aim for. The original is just below.
I will be using this free stock image. You will find it here
It belongs to Melyssah6-Stock
Step 1 : Click on the Adjustment Layer button at the bottom of the Layers palette.
Step 2 : Click on Levels.
Step 3 : The Levels 1 Adjustment Layer forms above the Background layer.
Step 4 : Change the Blend Mode to Multiply.
The total image darkens.
Step 5 : Click on layer thumbnail of the Levels 1 layer.
You can see the Levels.
Step 6 : Drag the Black point to the right till the image darkens even more
The image darkens a bit more.
Step 7 : Click on the Layer Mask. When you click you will be able to see a tiny border as above which means it is selected.
Step 8 : The foreground Color should be set to Black.
Step 9 : Click b on the keyboard for the Brush Tool. To make it large press ] (right square bracket) and to make it small (left square bracket). To make it hard press SHIFT+] and to make it soft SHIFT+[. We will be using a soft brush.
Step 10 : In the top panel lower the Opacity of the Brush to 40%. You can lower it more if you want, it will just take more time to complete the job. But it is worthwhile.
Step 11 : With a small, soft brush (you can increase the size when needed) go over the figure twice or thrice. Since the Opacity is set at 40% you are brushing away small increments of the mask. Keep away from edges. Change the size of the brush as needed. Concentrate on the face and skin areas and then on the clothes.
Step 12 : See the Layer Mask. You can see where you have brushed. Do it once more.
The layer mask after more brushing.
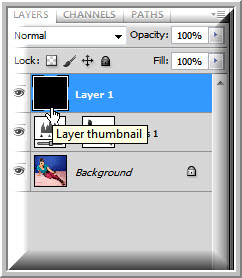
Step 13 : Click the New Layer icon. A new layer 1 forms.
Step 14 : The Foreground Color is set to Black.
Step 15 : Press ALT+BACKSPACE to fill with the Foreground Color which is Black in Layer 1.
Step 16 : Press v on the keyboard and then 1. This will lower the Opacity of the layer to 10%.
Step 17 : Click on the Layer Mask in the Levels 1 layer.
Step 18 : Press ALT and drag the mask to Layer 1.
Step 19 : A duplicate of the Mask forms on Layer 1.
The finished image.
Other photoshop tutorial are here
Subscribe to:
Post Comments (Atom)


No comments:
Post a Comment