Sunday, November 8, 2015
Glowing Circles in Photoshop
This is a tutorial on creating glowing circles which can be added to any suitable image. It is not at all difficult, but requires just a bit of patience. You need not be an expert to try this tutorial.
Step 1 : I have opened this free stock image in Photoshop. You can download it here.
This belongs to mjranum-stock.
Step 2 : Click the New Layer icon and a new Layer 1 forms above the Background Layer.
Step 3 : Click the Elliptical Marquee Tool.
Step 4 : I have zoomed into the hand.
Step 5 : I have drawn a selection with the Elliptical Marquee Tool.
Step 6 : Switch over to the Paths palette.
Click the Make Workpath from Selection icon shown by the red arrow.
Step 7 : As soon as you click, the marching ants selections changes into a Path.
Step 8 : You can also see the Workpath in the Paths palette.
Step 9 : Press x on the keyboard to change the Foreground Color to White.
Step 10 : Click the Brush Tool.
Step 11 : Click where the arrow points. It will reveal the Brushes. I have clicked on Brush No 9.
Step 12 : Right click the Workpath and from the dropdown click on Stroke Path.
Step 13 : As soon as you click this dialogue box opens. Click OK.
Step 14 : As soon as you click the path it strokes with the Brush. Note that path is still visible. We don't want it.
Step 15 : Click anywhere below the Workpath.
Step 16 : The Workpath has disappeared.
Step 17 : Click back on the Layers palette. Click on the Layer Style icon shown by the arrow.
Step 18 From the pop up menu click on Outer Glow.
Step 19 : The Layer Styles dialogue (Outer Glow) dialogue box opens. Click where the hand points to set the color of the glow.
Step 20 : The Color Picker pops up. I have clicked on the Spectrum in the middle. I have clicked on light blue and then clicked a lighter shade at left. The color I have chosen is a6f5ed. You can see it in the highlighted box. If you want the same shade just type a6f5ed in the box. Click OK.
Step 21 : I have dragged the Size slider to 15 and the Spread to 5. Click OK.
Step 22 : This is how the image looks.
This is how the Layers palette looks.
Step 23 : Press CTRL+J. Layer 1 duplicates into Layer 1 copy.
Step 24 : Click the Move Tool.
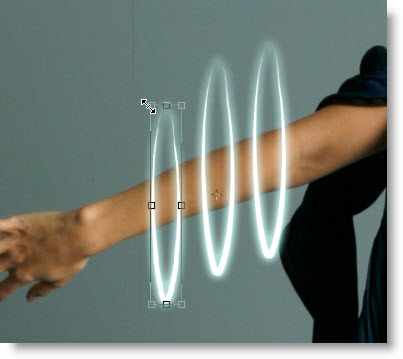
Step 25 : Use the Move Tool to drag the second ring to the left.
Step 26 : Press CTRL+J. A new Layer 1 copy 2 forms.
Step 27 : Use the Move Tool to separate the third ring from the second and drag it towards the left.
Step 28 : Press CTRL+T. Then press SHIFT+ALT and drag the left top corner handle down slightly. It will decrease the size of the ring. Press ENTER.
Step 29 : Press CTRL+J. A new Layer 1 copy 3 forms.
Step 30 : Use the Move Tool to separate the fourth ring from the third and then resize it. This is how you can create the rings. You can increase or decrease the size of the rings by pressing CTRL+T, then press SHIFT+ALT and dragging a corner handle. Lastly press ENTER,
I have completed the rings.
Step 31 : Look in the Layers palette. You are on the topmost layer, which is highlighted.
Step 32 : Press SHIFT and click on the lower most layer above the Background layer. All the layers will be highlighted.
Step 33 : Press CTRL+E. All the Layer compress into one over the Background Layer.
Step 34 : Click the Add Layer Mask button and a Layer Mask forms next to layer thumbnail on the topmost layer which in my case is Layer 1 copy 8.
Step 35 : The Foreground Color should be Black.
Step 36 : Click the Brush Tool.
Step 37 : Click in the top panel to reveal the Brushes palette. Set the Hardness to 75% . I have set the Brush size at 9 pixel.
Step 38 : Zoom into the image. You can see that I have set a small Brush size.
Step 39 : I have begun painting away the first ring.
Step 40 : This is how the ring looks after painting with the Brush. You have to paint away portions of the other rings similarly.
Step 41 : This is how the rings looks after painting away portions of it with the Brush.
This is how the image looks.
This is how the Layers palette looks. All the rings are on Layer 1 copy 8. The other, the Background Layer, is the image of the dancer.
Step 42 : Click on the New Layer icon and a new Layer 1 forms over Layer 1 copy 8.
Step 43 : Click the Elliptical Marquee Tool.
Step 44 : Draw a selection as shown.
Step 45 : Click the Brush Tool.
Step 46 : Click this icon in the top panel.
Step 47 : Click the Brush Tip Shape and click on Brush No 59 as I have done.
Step 48 : Check the Shape Dynamics and Scattering.
Step 49 : Click on Brush No 59 and click on Brush Tip Shape. Now drag the Spacing slider to the right till the brush separates.
Step 50 : Press x on the keyboard t change the Foreground Color to White.
Step 51 : Click on the icon at the bottom of the Paths palette.
Step 52 : The selection turns into a Path.
Step 53 : Right click the Work Path in the Paths palette. From the dropdown click on Stroke Path.
Step 54 : This dialogue box pops up. Click OK.
Step 55 : Click anywhere below the Workpath and the Path disappears from the image.
This is how the image looks.
Step 56 : Click back on the Layers palette and click on the Add a Layer Style icon.
Step 57 : From the popup click on Outer Glow.
Step 58 : Click on the square of color the hand points to.
Step 59 : The Color Picker pops up. I have clicked on a shade of Green in the Spectrum in the middle and it shows the color I have picked at the left. The number of the color is 75e836. Click OK. Click OK in the Layer Style dialogue box.
This is how the Brush looks like.
Step 60 : Press CTRL+J. A New Layer 1 copy forms.
Step 61 : Click the Move Tool.
Step 62 : Drag the layer down as shown.
Step 63 : Press CTRL+T. A selection will appear.
Step 64 : Drag the selection at left as shown. Press ENTER.
Step 65 : Double Click on the Outer Glow beneath Layer 1 copy.
Step 66 : The Layer Styles dialogue box opens. Click on the Set color of Glow.
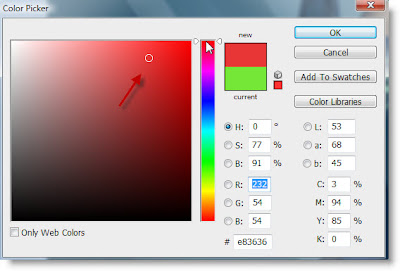
Step 67 : Th Color Picker opens and I have clicked on a shade of red. You can choose any color you want of course.
Click OK in the Color Picker and the Outer Glow dialogue box.
This is how the image looks.
Step 68 : In the Layer palette, the topmost layer -- Layer 1 copy is highlighted. Press SHIFT and click on Layer 1. Both the layers are now highlighted.
Step 69 : Press CTRL+E. Both the Layers are compressed into Layer 1 copy.
Step 70 : Click on the Add Layer Mask button. A Layer Mask forms on Layer 1 copy.
Step 71 : Make sure the Foreground Color is set to Black. You can press x on the keyboard to switch between the Foreground and Background colors.
Step 72 : Click on the Brush Tool. You can increase the Brush tip by pressing ] (right bracket) and decrease it by pressing [ (left bracket) on the keyboard.
Step 73 : Click in the top panel to reveal the Brush preset, then click on the where the arrow points at the right top.
Step 74 : In the dialogue box that opens click on Reset Brushes.
Step 75 : This dialogue box opens. Click OK.
Step 76 : Click in the top panel to reveal the Brushes and set the Hardness to 75 %. You can control the Brush size with the [ (left bracket) and ] (right bracket).
Step 77 : Click on the small icon in the top panel at right. When the Brushes dialogue box opens make sure that Shape Dynamics and Scattering are not checked.
Step 78 : Begin brushing away portions of the ring.
Step 79 : Brush away carefully. If you accidentally brush a portion that should remain, press x to change the Foreground Color to White. Paint out the mistake. Press x again and continue painting.
And, here is the finished image.
Step 80 : Click on the Background Layer.
Step 81 : Click on the New Layer icon. A new Layer 1 forms.
Step 82 : Click the Gradient Tool. Click on top to bring up the Gradient Editor.
Step 83 : Click on the Red Green gradient. Click OK.
Step 84 : Drag the Gradient Tool a part of the middle diagonally in the centre.
This is how the image looks.
Step 85 : Change the Blend Mode to Soft Light in the Layers palette.
Reduce the Opacity of the Layer to 75%.
The finished image. That is all.
Other Photoshop tutorials are here.
Subscribe to:
Post Comments (Atom)


No comments:
Post a Comment