Monday, November 16, 2015
Gradient Editing 2
I showed how Gradients can be edited in Photoshop. The tutorial is here
Here is something more. You can make your own Gradients and save them for later use.
I will be using this free stock image. It is here
It belongs to ~Kaitrosebd-Stock
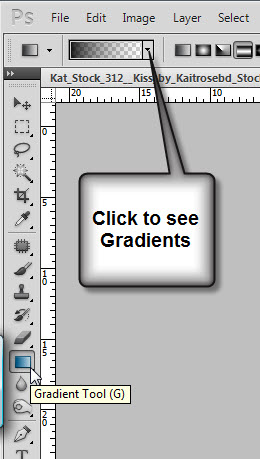
Click on the Gradient Tool or press g on the keyboard. Click at the top where shown to see the Gradients.
You can see the Gradients now. To see the additional Gradients click the small arrow at right.
Now you can see the additional Gradients.
I am clicking on Color Harmonies 1. You can click any of them.
This dialogue box opens. Click OK.
The Color Harmonies 1 is selected.
You must always remember to reset the Gradients to the default after using a particular set of Gradients.
I am clicking on one of the Gradients. You can see its name by hovering the cursor over it.
Click at the top.
The Gradient Editor opens.
You can use either Solid or Noise as Gradient Type. It is always set to Solid as default.
If you check the Restrict Colors and Add Transparency the Gradient changes. If you click the Randomize button at the bottom, the Gradient will keep changing. Click OK just for now.
Before applying the Gradient make a new layer by clicking on the New Layer icon. Layer 1 forms above the Background Layer.
.Drag diagonally from bottom to top. You can drag in any direction. You will get a different effect.
You can drag from any portion to any portion of the image to get another effect.
The image look like this.
You can experiment with the Blend Modes after applying the Gradient. I have selected Dissolve which is rarely used.
The image looks like this.
I am dropping the Opacity of he layer down to 35%. There is nothing hard and fast about it. It will depend on your image.
The image looks like this.
Go to Filter>Distort>Polar Coordinates.
The Polar Coordinates dialogue box opens. By default Rectangular to Polar is checked. I am using Polar to Rectangular. Click OK.
The image looks like this.
Click the Add layer Mask button. A Layer Mask forms next to the layer thumbnail on Layer1.
Click the Brush Tool or just press b on the keyboard. The Foreground/Background colors should be set to Black/White which is the default. If it is not press x and then d on the keyboard to reset it to the default.
Click at the top to reveal the Brush Controls. You can set the Size and Hardness. To increase the size of the Brush you can use ] (right bracket key) as a shortcut and to decrease it press [ (left bracket key). To make a Brush hard press SHIFT+] and to make it soft SHIFT+[.
I have painted over the face and parts of the dress.
I have made the brush smaller by pressing the [ bracket and painted the hand.
This is how the image looks. However to continue with the Gradients.
Drag Layer 1 to the trash can.
After deleting the layer and layer mask click the new layer icon and a new Layer 1 forms.
Bring up the Gradient Editor again. Change the Gradient Type to Solid.
Click on the Yellow Color Stop at left. The color which was grayed out changes to yellow.
You can add a stop by clicking on the bottom.
A new color stop has formed.
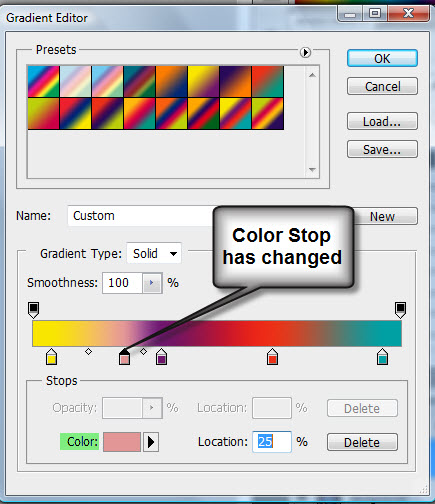
With the Gradient Editor open I am clicking on the hand.
The Color of the Color Stop has changed.
Click on the third Color Stop.
I have clicked on a portion of the dress.
The color of the stop and the Color has changed.
Click to add new Color Stop.
I have clicked on the hand.
The Color and the Stop Color changes to the color clicked.
Click to add a new Color Stop.
Click again to add a new Color stop.
If you want to save the Gradient for later use also click new. You can give the Gradient a name and click OK in the Gradient Editor. You can see the new gradient at the bottom.
After you click OK you can still see the Gradient in the Gradient Editor at the top.
At the top you will find the different kinds of Gradients. Each gives a different effect. By default the Linear Gradient is the most often used.
Drag with the Gradient Tool in any direction. You will get different effects. I have drawn down diagonally
The Gradient Looks like this. It is the Linear Gradient.
If I use the Radial Gradient it would have looked like this.
If I use the Angle Gradient it looks like this.
If I use the Reflected Gradient it looks like this.
If I use the Diamond Gradient it looks like this. This is give you an idea of the different effects you create.
I am changing the Blend Mode to Overlay.
The image looks like this.
Click the Add Layer Mask button and a layer mask forms next to the layer thumbnail on Layer1.
Press b to bring up the Brush Tool. I have painted away the potions where I wish to keep the original color.
Press x on the keyboard to switch the Foreground Color to paint with white if you accidentally reveal what you did not intend to.
This is how the finished image looks like.
Other photoshop tutorials are here
Labels:
Gradient Editing 2
Subscribe to:
Post Comments (Atom)


No comments:
Post a Comment