Friday, November 20, 2015
Image and Text
Using Text with an image can get a good effect. But it does take time. This will be a refresher tutorial on the Type Tool in Photoshop.
This is the effect I will create.
Or this.
I will be using this image. You will find it here
It belongs to Melyssah6-Stock
Step 1 : Click the New Layer icon. A new Layer 1 forms.
Step 2 : The Foreground Color should be set to Black.
Step 3 : Press ALT+BACKSPACE to fill with the Foreground Color which is Black. Layer 1 is filled with Black.
The image is completely hidden by the Black Layer 1.
Step 4 : Click the Horizontal Type Tool.
Step 5 : Click in the top panel where the arrow points to see the Fonts available in your version of Photoshop.
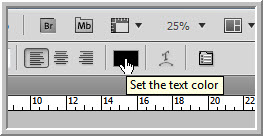
Step 6 : We have to change the Font Color from Black. Click where shown.
Step 7 : The Set text Color dialogue comes up. It is the same as the Color Picker. Type ffffff in the box shown. It stands for white. Click OK. The Text Color has been set to White.
Step 8 : Set the alignment of the Text.
Step 9 : Change the Font size from here for every line of Text. Here the Font size is set to 14. So let us begin with it.
Step 10 : click anywhere on the Black canvas and start to type. I have typed scarface in 14 points.
Step 11 : Click the arrow in the top panel to commit the Text.
In the Layers panel you will be able to see the first Text Layer. There will be many layers.
Step 12 : I have selected a different font and size and written a second word. You can use any font. Remember to change the size and font and also to commit the Text.
See in the Layers panel. A second Text Layer has been added. This is how you must proceed. This is where it will take time.
This is some of the Text I have added. It will take time since you have to add word by word. You can also see that I have rotated the Text.
In the Layers panel you can see the Layers adding up as each word is on a separate layer.
Step 13 : It took me a long time, but I have completed the Text work.
Step 14 : Click the topmost Text layer.
Step 15 : Press SHIFT and click on the Text layer above Layer 1 which has been filled with black. All the text layers are highlighted.
Step 16 : Right click. From the pop up click on Convert to Smart Object.
All the Text layers have been converted into a Smart Object. There are only just three layers -- the Background, Layer 1 filled with Black and the Smart Object layer which is the topmost.
Step 17 : Click the Add Layer Mask button and a Layer Mask forms on the topmost layer.
Step 18 : Click on the Background Layer which contains the image. Press CTRL+A (select all) and CTRL+C (copy).
Step 19 : Now ALT+Click on the Layer Mask.
You will immediately see this. It is the Layer Mask that you are seeing with the marching ants at the edges.
Step 20 : Press CTRL+V. The image will appear in black and white. The image has been pasted into the Layer Mask.
The image is seen pasted in the layer mask.
Step 21 : ALT+Click the layer mask again. Press CTRL+D to deselect. The marching ants selection go away.
The image looks like this.
Step 22 : Click off the eye icons of the two top layers.
Step 23 : Separate the figure from the Background. You can use the Pen Tool, Quick selection Tool or even the Lasso Tool.
Step 24 : Drag up the Background copy layer or the one where the image has been separated from the background. Press CTRL+SHIFT+U to desaturate the layer.
This is how the image looks.
You can also drag the Background copy layer to the top of the stack for a different effect.
This is the effect you will get.
Other photoshop tutorials are here
Labels:
Image and Text
Subscribe to:
Post Comments (Atom)


No comments:
Post a Comment