Friday, November 6, 2015
Lomo Effect Quick tutorial
Creating a lomo effect can be done without too much hassle in Photoshop. Just follow along. A lomo effect is a dark, gritty look in images. I am doing this in CS5.
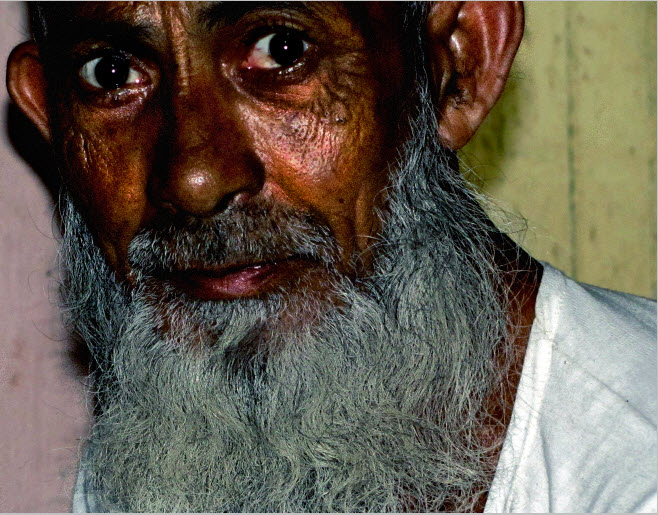
This is the look I will achieve.
I have opened this free stock in photoshop. It can be downloaded here
It has been uploaded by me. You can use it. I have only cropped the image. I am sure you know how to do that.
Step 1 : In the Layers palette, click on the Adjustment Layer button.
Step 2 : Click on Exposure from the pop up menu.
Step 3 : I have dragged the Exposure slider just a bit to the right and the Offset slider a bit to the left. There is no fixed rule for this. Settle for what you like.
The image looks like this. You basically add light to the image and then offset it.
Step 4 : Click the Adjustment Layer button and click on Curves.
Step 5 : A curves1 Layer forms and the Curves dialogue box opens.
Step 6 : Drag the diagonal at the bottom while watching your image. It will become darker.
The image looks like this.
Step 7 : Click the Adjustment Layer button and click on Curves again.
Step 8 : A Curves 2 Layer forms.
Step 9 : Note there are Red, Green and Blue in addition to the RGB channel. We worked on the RGB channel only earlier. Now we will use the Red, Green and Blue channels.
Step 10 : I have dragged the bottom of the diagonal in the Red channel slightly.
A greenish tinge appears in the beard. The image becomes darker.
Step 11 : Click the Green channel which is next and drag the diagonal down a bit.
The image looks a bit darker more now. The green tinge has gone, though a faint bluish tinge can be seen in the beard.
Step 12 : Click on the Blue channel and the drag the diagonal up slightly.
The image now has that dark look Note in the three channels Red, Green and Blue you may have to make slight adjustments depending on your image. You may have to push up the diagonal where I have pushed down. Do not take the adjustments in the Red, Green and Blue channels as I have done being applicable to all images. Please experiment.
Step 13 : Now press CTRL+SHIFT+ALT+E to make a composite Layer 1.
Step 14 : Press CTRL+J to make Layer 1 copy.
Step 15 : Zoom into the image.
Step 16 : Go to Filter>Noise>Add Noise.
Step 17 : In the Add Noise, Set the Amount to around 10 and Distribution to Gaussian. You can see the effect in the Preview box. Click OK.
Zoom out. The Noise has also been added to the Background which is not what we wanted.
Step 18 : Click the Add Layer Mask button. A Layer Mask forms on Layer copy.
Step 19 : Make sure that the Foreground/Background Colors are set to Black/White. If not press x and then d on the keyboard to restore the default.
Step 20 : Click the Brush Tool.
Step 21 : Click in the top panel to reveal the Brush controls. Set the Hardness to 0. To increase the size of the brush press ] (right square bracket) and to decrease it [ (left square bracket).
Step 22 : Increase and decrease the Brush as you paint different areas. I have painted away the Noise from the background, clothes and eyes.
The image looks like this.
Step 23 : Press CTRL+SHIFT+ALT+E. A composite layer 2 forms.
Step 22 : Click on the Dodge Tool.
Step 24 : In the top panel set the exposure low at maybe around 7 %.
Step 25 : Go over (i.e. paint) over the Highlights in the image keeping away from the midtones and shadows.
Step 26 : Now set the Range to Midtones. I have left the Exposure setting unchanged.
Step 27 : Go over the midtones in the image.
Step 28 : Change the Range to Shadows.
Step 29 : Dodge the shadows lastly.
Step 30 : Click on the Burn Tool.
Step 31 : Change the Range to Shadows. Exposure is set to 7 %.
Step 32 : Use the Burn tool on the shadows, especially the furrows on the face and on the dark portion of the beard.
Step 33 : Change the Range of the Burn Tool to Midtones.
Step 34 : Go over the midtones with the Burn Tool. Also use the Burn Tool on the beard.
Step 35 : Lastly change the Range to Highlights.
Step 36 : Go over the Highlights gently. Also paint the beard.
The finished image. That is all.
Other photoshop tutorials are here
Subscribe to:
Post Comments (Atom)


No comments:
Post a Comment