Monday, November 2, 2015
Masks Trick
I am calling this tutorial Masks Trick, but it is not a trick at all, though it may look like one. It is just a very different way of using Masks to make a clean selection. It can be done in any version of Photoshop. You can use these tweaks while working on your images when required.
This is the Layer Mask at the bottom of the Layers palette.
This is the Edit in Quick Mode button, which pressed again in Photoshop CS 5 changes to Edit in Standard Mode. Earlier versions of Photoshop have two buttons for the two different Modes.
These are the two different kinds of Mask and are different. But did you know that the Layer Mask can also be used as a Quick Mask? Possibly not. So let us proceed to the tutorial.
I will be using this free stock image to teach you the trick with Masks. You will find it here
It belongs to dust-stock
Step 1 : Drag the lock on the Background Layer to the Trash can.
Step 2 : The Background Layer changes to Layer 0. Press CTRL+J to duplicate Layer 0 into Layer 0 copy.
Step 3 : Click the New Fill or Adjustment Layer button. Click on Hue/Saturation from the popup.
Step 4 : The Hue/Saturation Layer forms over Layer 0 copy. In the Hue/Saturation check Colorize.
The image looks like this.
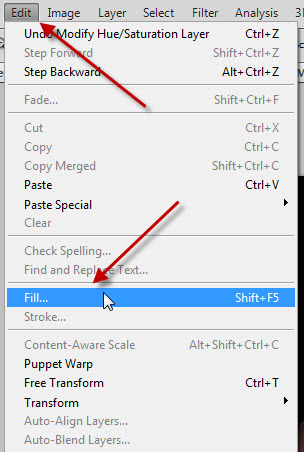
Step 5 : Go to Edit>Fill.
Step 6 : In the Fill dialogue, change the Use to Black. Click OK. Now for the first trick.
Step 7 : Press SHIFT+ALT+CLICK on the Layer Mask thumbnail.
Step 8 : The image is filled with a reddish hue just like if you were to use a Quick Mask.
Step 9 : Click the Brush Tool. To increase the size of the Brush press ] (right bracket) and to make it small [ (left bracket). To make the Bush hard pres SHIFT+] and to make it soft SHIFT+[. We will be using a soft Brush.
Step 10 : Press x on the keyboard to change the Foreground Color to White.
Step 11 : Begin painting with the Brush.
Step 12 : I have painted both the eyes to reveal them.
Step 13 : Press ALT and click on the Layer Mask.
The image looks like this.
Step 14 : ALT+CLICK the Layer Mask again.
Step 15 : Now you can see the Mask itself.
Step 16 : You can see the gray flecks where the Brush missed out.
Step 17 : Use the Brush to paint out the gray bits in both eyes.
The gray bits have been painted out.
Step 18 : Press ALT+CLICK on the Layer Mask.
The image looks like this.
Step 19 : I have dragged the Hue slider to get a Green tint. I have increased the Saturation and the Lightness. You can see my settings. Your settings will depend on your image and the Hue you want.
Step 20 : The image looks like this.
The Layers palette looks like this.
Step 21 : Press CTRL+SHIFT+E to Merge Layers. There is now only the single Background Layer.
Step 22 : Press CTRL+J to duplicate the Background Layer into Layer1. Add a Hue/Saturation Layer as earlier. Check Colorize.
Step 23 : Go to Edit>Fill.
Step 24 : Fill with Black.
Step 25 : Press SHIFT+ALT+CLICK.
The image looks like this.
Step 26 : The Foreground Color is White. Click the Brush Tool.
Step 27 : Paint lips with the Brush.
Step 28 : Press ALT+CLICK twice.
Step 29 : Paint out the gray flecks.
Step 30 : ALT+CLICK the Mask.
Step 31 : Since I want to keep the lips Red, I am not touching the Hue slider. I have increased the Saturation and decreased the Lightness.
The finished image. The purpose of the tutorial was to show the Tweaks with the Layer Mask. You can use it while working on other images in Photohop.
Other Photoshop tutorials are here
The image looks like this.
Step 19 : I have dragged the Hue slider to get a Green tint. I have increased the Saturation and the Lightness. You can see my settings. Your settings will depend on your image and the Hue you want.
Step 20 : The image looks like this.
The Layers palette looks like this.
Step 21 : Press CTRL+SHIFT+E to Merge Layers. There is now only the single Background Layer.
Step 22 : Press CTRL+J to duplicate the Background Layer into Layer1. Add a Hue/Saturation Layer as earlier. Check Colorize.
Step 23 : Go to Edit>Fill.
Step 24 : Fill with Black.
Step 25 : Press SHIFT+ALT+CLICK.
The image looks like this.
Step 26 : The Foreground Color is White. Click the Brush Tool.
Step 27 : Paint lips with the Brush.
Step 28 : Press ALT+CLICK twice.
Step 29 : Paint out the gray flecks.
Step 30 : ALT+CLICK the Mask.
Step 31 : Since I want to keep the lips Red, I am not touching the Hue slider. I have increased the Saturation and decreased the Lightness.
The finished image. The purpose of the tutorial was to show the Tweaks with the Layer Mask. You can use it while working on other images in Photohop.
Other Photoshop tutorials are here
Labels:
Masks Trick
Subscribe to:
Post Comments (Atom)


No comments:
Post a Comment