Monday, November 23, 2015
Pale Skin with Photoshop
Doctors can be very concerned at paleness, but some like almost white images with pale skin tones. This can be easily done in Photoshop. There is the hard way and there is the easy way. This is the easy way. This look can be done with Adjustment Layers, which are non-destructive.
I will be using this free stock image for this tutorial. You can download it here
It belongs to Aconyte-Stock
This is the effect I will achieve.
Step 1 : Click the Adjustment Layer button.
Step 2 : Click on Photo Filter from the pop up menu.
Step 3 : The Photo Filter appears.
Step 4 : From the drop down you can see the various photo filters available. I have clicked on Orange. Other filters such as the Cooling Filters or Blue will work just as well. The result will be just a bit different.
Step 5 : The Photo Filter Adjustment Layer appears over the Background Layer.
There is a slight difference in the tone of the image after using the Photo Filter adjustment.
Step 6 : Click the Adjustment Layer button again and click on Hue/Saturation.
Step 7 : The Hue/Saturation Adjustment layer forms.
Step 8 : Drag the Saturation slider to -90.
Step 9 : Click the Adjustment Layer button and click on the Curves.
Step 10 : The Curves Adjust layer appears.
Step 11 : In the Curves dialogue click exactly on the middle.
Step 12 : Keeping SHIFT pressed press the UP ARROW on the keyboard twice.
The image looks like this.
Step 13 : The Curves 1 Adjustment layer is highlighted as this is the Layer we are on. Press SHIFT and click on Photo Filter Adjustment layer.
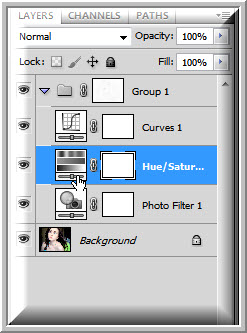
Step 14 : All the three layers are highlighted.
Step 15 : Press CTRL+G. The three Adjustment Layers are grouped together in Group 1 Layer.
Step 16 : Click the Layer Mask button. A Layer Mask forms on the Group 1 Layer.
The Foreground color should be set to Black which is the default.
Step 17 : Press b on the keyboard to bring up the Brush Tool or click on it. To make the Brush large pres ] (right square bracket) and to make it small [ (left square bracket). To make the Brush soft press SHIFT+[ and to make it hard press SHIFT+]. We will be using a soft brush here.
Step 18 : In the top panel keep the Mode set at Normal, Opacity at 10% and Flow at 5%.
Step 19 : Make the Brush large and paint over the entire image at one go.
Step 20 : Make the Brush small and paint over the hair and the skin areas in one go.
Step 21 : Make the Brush smaller still and paint only over the skin areas excluding the hair.
Step 22 : Zoom into the image so that you can see the eyes and the lips.
Step 23 : In the top panel increase the Opacity of Brush (click the Brush Tool) to 20%.
Step 24 : Make the Brush smaller still and paint over the eyes and lips a number of time.
Step 25 : Note the right pointing arrow on the Group 1 layer.
Step 26 : Click the arrow and it points down. All the layers in the group are also revealed.
Step 27 : Click on the Hue/Saturation layer and click on the thumbnail.
Step 28 : Decrease the Saturation to -70 to bring some of the color of the original image back.
The finished image.
Other photoshop tutorials are here
Subscribe to:
Post Comments (Atom)


No comments:
Post a Comment