Monday, November 9, 2015
Photoshop Tutorial Blending
Sometimes a Blend Mode in Photoshop will give very beautiful results. Blend Modes have remained unchanged in Photoshop except for two which are not available in Photoshop7. We will only be using the Blend Modes that are available in all versions of Photoshop.
This is how the edited picture will look.
I will be using these two stock images for this tutorial.
The Quick Selection Tool is not available in versions of Photoshop lower than CS5. It does not matter. The old tools will do just as well.
Step 1 : Click on the Lasso Tool.
Step 2 : Make a rough selection as shown with the Lasso Tool.
Step 3 : Click the Magnetic Lasso. At the top click the Subtract from Selection icon.
Step 4 : Click outside the selection with the Magnetic Lasso.
Step 5 : Click and drag with the Magnetic Lasso, press Delete if you place a point wrongly. It will delete the last point.
The selection has been refined.
Step 6 : Click and drag another portion with the Magnetic Lasso to select a fresh portion.
This refines some more of the selection. This is how to go about it.
The selection of the face has been refined. There are some problems at the sides but I will tackle it later.
Step 7 : Press CTRL+J to copy and paste the selection on Layer 1.
Step 8 : Press CTRL+Click New Layer icon. A new Layer 2 forms under Layer1.
Step 9 : Click on Layer 1 and then click on the Layer thumbnail.
A selection reappears.
Step 10 : I am going to the other image and pressing CTRL+A (Select All and then CTRL+C (Copy).
Step 11 : I am going over to the face and pressing CTRL+SHIFT+ALT+V to Paste Into. The image looks like this.
Step 12 : Change the Blend Mode to Overlay. Soft Light and Screen might also work.
The image looks like this.
Step 13 : Lower the Opacity to 75%. It can a bit more or less also.
The image looks like this.
Step 14 CTRL+Click Layer thumbnail on Layer 1.
The selection reappears.
Step 15 : Press CTRL+SHIFT+I to inverse the selection.
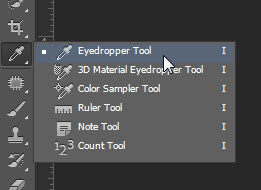
Step 16 : Click the Eyedropper Tool.
Step 14 : I have clicked on a dark portion with the Eyedropper.
The Foreground Color changes to the color picked.
Step 15 : Click on Layer 2.
Step 16 : Press ALT+BACKSPACE to fill with the Foreground Color.
Step 17 : Press CTRL+D to deselect. Crop the sides to take care of the minor problems or use the Erazer Tool on Layer1 and that is all.
Other photoshop tutorials are here
Subscribe to:
Post Comments (Atom)


No comments:
Post a Comment