Sunday, November 15, 2015
Selective Blur in Photoshop
Telephoto lenses in cameras can keep the object in sharp focus and blur out the background or areas which are not in focus. The same effect can be done with any version of photoshop and requires no great skill.
This is the effect I will create
This is the effect I will create
I will be using this full body stock. You will find it here
It belongs to caseykitten
Study the image. Both the model and the wall are in sharp focus. If we want our eyes to focus on the model only we can blur the brick wall. There is a very simple way to do it.
Step 1 : Duplicate the Background Layer by pressing CTRL+J. Actually it is not required and can be done on a single layer. But I am using a new Layer 1.
Step 2 : Click the Edit in Quick Mask Mode button. In some versions of photoshop there are two buttons. The other button is the Edit in Standard Mode button. Here a single one doubles up for both.
Step 3 : Click the Brush Tool.
Step 4 : Click where the arrow points to open the Brush controls in the top panel. Set the Hardness to 0%. For increasing the Size use the [ (left square bracket) to decrease the size and ] (right square bracket) to increase it.
Step 5 : In the top panel I am leaving the Mode, Opacity and Flow at the default settings.
Step 6 : Increase the Brush size by pressing the ] (right square bracket).
Step 7 : Ensure that Black is set as the Foreground color.
Step 8 : Begin painting with the Brush. It seems you are painting with Red. I am not only painting the model but some of the background also.
Step 9 : I have finished painting. I have not only painted the model but also some of the wall.
Step 10 : Click the button again.
Step 11 : As soon you click the button. A selection appears.
Step 12 : Go to Select>Modify>Feather.
Step 13 : Set the Feather Radius to 100 pixels. Click OK.
Step 14 : Go to Filter>Blur>Gaussian. Advanced versions have Box Blur, Shape Blur, Smart Blur and Surface Blur. Photoshop7 does not have them. So I am using Gaussian Blur.
Step 15 : In the Gaussian Blur I have set the Radius to 15. Nothing hard and fast about it. It will depend whether you are using a high or a low resolution image.
Click OK.
Step 16 : The model has remained in sharp focus and also the wall immediately behind her. The other portions have been blurred and are no longer in sharp focus. That's it. It is as simple as that.
Step 17 : This is just an additional part just to add an effect to this image.
Click the New Layer icon and a new Layer 2 forms.
Step 18 : Make sure that the Foreground/Background are set to the default Black/White.
Step19 : Click the Gradient Tool. Click in the top panel to open the Gradient Editor.
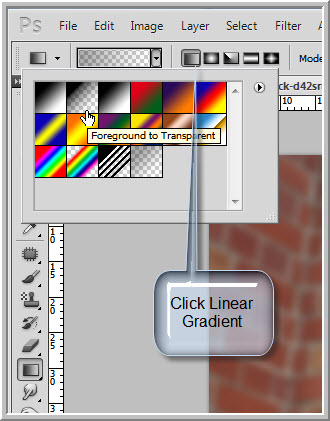
Step 20 : In the Gradient Editor click the Foreground to Transparent. In the top panel the Linear Gradient is set by default, If it is not click it.
Step 21 : Drag the Gradient diagonally as shown. It is not drawn across the entire image.
Step 22 : The left top corner darkens like a shadow. You can reapply the Gradient if you wish to make to it darker still. But I am not doing it.
Step 23 : Drag the Gradient Tool partly downwards as shown.
The right bottom corner darkens. That is all.
Other photoshop tutorials are here
Subscribe to:
Post Comments (Atom)


No comments:
Post a Comment