Tuesday, November 24, 2015
Sun Rays or Star Burst with Photoshop
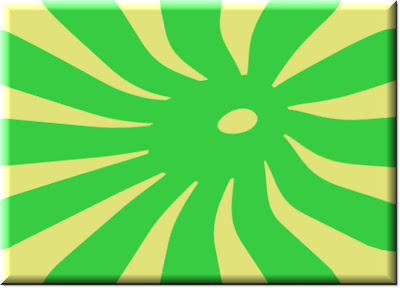
I have been asked to post a tutorial on a retro sun ray (some call in star burst) with Photoshop. You can use it as background for a card or for text.
Step 1 : Open a new white Layer. The size does not matter. I have opened a large document.
Step 2 : Click on the Foreground Color.
Step 3 : This opens the Color Picker.
Step 4 : The column of color in the middle is the Spectrum. There is a tiny slider which you can move up and down to change the color in the box at the left. I have moved the slider to Green and clicked on a shade of green. The numerical value of the color is given in the green highlighted box. It is 37cc42. You can choose any color you like. Click OK in the Color Picker.
Step 5 : The Foreground Color changes to the color picked in the Color Picker.
Step 6 : Click on the Custom Shape Tool from the panel in the left panel.
Step 7 : Click where the Red arrow points to. It will reveal the shapes. Now click on the tiny black arrow at the right that the Green arrow points to.
Step 8 : Click on 'All' from the drop down menu.
Step 9 : This dialogue box opens. Click OK.
Step 10 : Now drag the slider down till you come to shape shown. It is called Flower 7. Click on it.
Step 11 : Now drag down diagonally. The shape filled with Green color selected earlier will form a shape like this.
This is how the layer pallete looks.
Step 12 : Right click the Shape 1 layer. From the pop up menu click on Rasterize Layer.
This is how the Rasterized layer look like.
Step 13 : Click the Rectangular Marquee Tool from the fly out.
Step 14 : Draw out a rectangular selection as shown with the Rectangular Marquee Tool.
Step 15 : Press CRTL+SHIFT+I. This will inverse the selection. Press Delete.
Step 16 : Press CTRL+D to deselect and this is how the image looks.
Step 17 : Press CTRL+T. A selection will form. Drag the left corner or right top corner diagonally up as shown. Press Enter.
Step 18 : Click on the Background layer in the Layers palette.
Step 19 : Click on the Foreground Color. The Color Picker comes up. Drag the slider on the Spectrum to Yellow. Click on a shade of yellow at the left. The numerical value of the shade I have picked is e1e279. Click OK in the Color Picker.
Step 20 : Press ALT +BACKSPACE. The Background layer fills with the Foreground Color which is now Yellow.
Step 21 : Click the Crop Tool from the fly out.Step 22 : Draw out a selection with the crop Tool as shown.
Step 23 : Click the Tick Mark in the top right hand side of the top panel.
This is how the image looks.
Step 24 : Click on Shape 1 layer.
Sep 25 : Click on Filter>Liquify.
step 26 : The Liquify dialogue opens. Note that the Brush I am going to use is a very large one.
Step 27 : In the controls at the right top you will find the Liquify controls. Set the Brush Pressure at 60 and Brush Density at 50. The Brush Size you can set so that it is a large one.
Step 28 : Click on the the top icon at the left.
Step 29 : With the Brush drag in any direction. You may have to do it a couple of times to make the rays bend. Click OK in the Liquify dialogue box after you are satisfied.
There you have the rays.
Step 30 : Click on the Foreground Color. This brings up the Color Picker. Drag the slider in the middle up. I have chosen a shade of Pink.
The Foreground Color changes to the Color I picked. You can choose any color you like. I have just shown you how to go about it.
Step 31 : Click the Custom Shape Tool.
Step 32 : Click in the top panel to reveal the Custom Shapes. Remember that it is set to 'All'. Scroll through to a shape you like. The Shapes may vary from your version of Photoshop. But, you will find something that you like. You can see the Shape I have clicked on.
Step 33 : The Shape I have chosen is called Fern. Hover you cursor over the Shapes to read their names.
Drag across the document. The more you drag the bigger the Shape will be, the less you drag the smaller it will be. Also note it has been filled by the Foreground Color chosen.
Step 34 : Look in the Layers palette. You will find a new Shape2 layer at the top. Right click it and click on Rasterize Layer.
The Shape 2 layer has been rasterized.
Step 35 : Again click on the Foreground Color to bring up the Color Picker. I have chosen a light Blue, by first dragging the slider in the Spectrum and then clicking on a shade in the box at the left. Click OK. The Foreground Color will change to the same shade.
Step 36 : Click in the top panel and choose another shape. I have chosen a music note by clicking it.
Step 37 : I have dragged out the shape. You can add as many shapes you want.
Step 38 : Right click the Shape layer and click on Rasterize Layer.
Step 39 : Click on Shape 1 layer.
Step 40 : Click on the Add Layer Styles icon and from the pop up click on Stroke.
Step 41 : In the Stroke dialogue box click on Color. This is CS4. The default Color is Black. In earlier versions it is Red. But, that does not matter. Click on the Color.
Step 42 : The Stroke Color dialogue box opens. It works in exactly like the same way as the Color Picker.
I have clicked on a color in the Spectrum and chosen a shade in the box at the left. Click OK. Click OK in the Layer Style dialogue box.
The rays have been applied a Pink stroke.
Step 43 : Click on Shape 2. Then click on Add Layer Style.
Step 44 : This brings up the Add Layer Styles pop up. Click on Stroke.
Step 45 : I am leaving the default color at Black. Click OK.
The Fern Shape has been stroked with Black.
Step 46 : Right click on the Shape 2 layer. From the pop up click on 'Copy Layer Style'.
Step 47 : Click on Shape 3 Layer. Right Click and from the pop up click on 'Paste Layer Style'.
The music note has also been stroked with Black.
Step 48 : Click on the New Layer icon at the bottom of the Layers palette and a new Layer 1 forms at the top.
Step 49 : Click on the Elliptical Marquee Tool from the fly out.
Step 50 : Draw out an Ellipse with the Elliptical Marquee.
Step 51 : Look at the Foreground and Background Color. Though we have changed the Foreground Color
to a light Blue, the Background Color is White.
Step 52 : Press CTRL+BACKSPACE. The selection fills with White which is the Background Color. Press CTRL+D to deselect.
Step 53 : Go to Edit>Blur>Gaussian Blur.
Step 54 : The Gaussian Blur dialogue box opens. Drag the Radius slider to the right till you are satisfied with the blur. You will be able to observe the effect on your image as you drag the slider. Click OK.
Step 55 : This is how the image looks with the Gaussian Blur applied.
Step 56 : In the Layers palette lower the opacity to 90% by dragging the slider.
This is how the image looks after lowering the opacity of the layer.
Step 57 : Click the New Layer button in the Layers palette and a new Layer 2 forms at the top.
Step 58 : Click on the Foreground Color. The Color Picker comes up. Drag the slider to choose any color. I have chosen a shade of brown. Click OK.
Step 59 : Click on the Rectangular Marquee Tool
Step 60 : Draw out a selection as shown.
Step 61 : Press ALT+BACKSPACE. The selection fills with the Foreground Color which we have changed to Brown. (Step 57).
Step 62 : Click the Add Layer Style button in the layer palette. From the pop up click on stroke.
Step 63 : In the Stroke Color dialogue box click on the color.
Step 64 : In the Stroke Color dialogue box I have clicked on a shade of Red. Click OK. Click in the Stroke dialogue box.
The Brown Rectangle has been stroked with Red.
Step 65 : Click on the Horizontal Type Tool.
Step 66 : Click where the arrow points to, to reveal the fonts available in your version of PS. Choose a font by click on it.
Step 67 : In the top panel set the size of the font by typing it into the box where the orange arrow points. The red arrow points to the Color of the Text, which by default is Black.
Step 68 : Draw out a Text box as shown, then type in the Text.
Step 69 : Click the Tick mark in the top panel.
Step 70 : Click the Move Tool.
Step 71 : Use the Down/Up/Left/Right arrow keys on the keyboard to position the Text.
Step 72 : Click on Styles to reveal the Styles.
Step 73 : I am clicking on one of the Styles.
The Style has been applied.
Step 74 : I have opened this image. You can download it here.
Step 75 : Press CTRL+A, then CTRL+C.
Step 76 : Press CTRL V after clicking on the poster we have made. The image is a large one. You will have to resize it. Press CTRL+T. A selection will appear around the edge of the photo. Press SHIFT+ALT and drag down diagonally from the left top to the bottom. You may have to do this a number of times to resize the image. Lastly press Enter to apply the transformation.
Step 77 The silhouette is on Layer 3. Drag it down with the cursor to below Layer 2.
Layer 3 has been dragged below layer 2.
Step 78 : Click the Magic Wand Tool
Step 79 : Click on the Black silhouette. A selection forms.
Step 80 : Press Ctrl+J. The selection will be cut and pasted onto Layer 4. Click off the eye icon of Layer 3.
Step 81 : Click the Add Layer Style button and from the pop up click on Outer Glow.
Step 82 : In the Outer Glow dialogue box I have increased the size to 20 and the Range to 60. Click OK.
Step 83 : Reduce the Opacity of the Layer to 50%.
And, this is how the image looks.
Step 84 : Press CTRL+J. Layer 4 duplicates into Layer 4 copy.
Step 85 : Use the Move Tool to move the layer suitably like I have done. And, that is all.
Other Photoshop tutorials are here.
Subscribe to:
Post Comments (Atom)


No comments:
Post a Comment