Friday, November 20, 2015
Tanned image


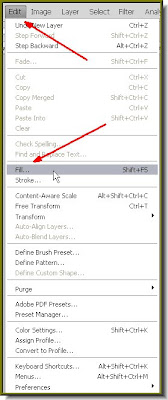

Step 4 : This dialogue box opens. From the drop down Menu in 'Use' click on Color. Click ok.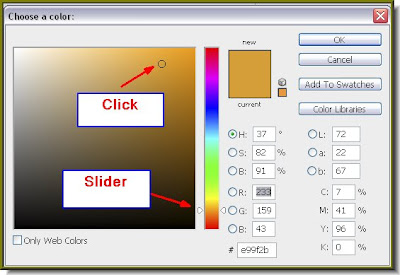
Step 5 : The Choose a Color dialogue box opens. Note the column of layers in the middle. It is called the Spectrum. Note that there is a slider at the bottom. Pushing the slider up or down will change the color in the display box at the left. I have dragged the slider to an orange color, then clicked on a shade of orange in the display box at left. Click ok.

Step 6 : This is how the image looks. It has been filled with the chosen color.
 Step 7 : Click where the white arrow points to in the Layers pallete to change the Blend Mode, which is by default set to Normal.
 The Blend Mode is set to Color Burn.

 Step 9 : Click on the Zoom Tool.
 Step 10 : I have zoomed into the image so that I can see the eyes clearly.
 Step 11 : Click on the Erazer Tool. It works just like a brush. Soften it as explained at the start of this tutorial.
 Step 12 : The Foreground Color is set Black by default and Background to White. Click the small bent arrow to make the Foreground Color White. If your Forground and Background Colors are not set to the default Black and White, press 'x' and then 'd'.
 Step 13 : I am now erazing the fill with the Erazer . The eyes are now white as it should be. Do likewise with the other eye.
 Step 15 : Click the Add New Layer Button and a new Layer 2 forms.
 Step 16 : Click the Brush Tool. Remember you must soften it first.
 Step 17 : Click the Forground Color. It does not matter what color it is.


You can use a different fill color to get some other effects like this. Just follow all the other steps as well.
No comments:
Post a Comment