Wednesday, November 4, 2015
Textures and Layers
You can do a lot of special effects with Textures. Photoshop does have Textures, but there are many more available for download absolutely free. You will find 30 excellent Textures here
You can download them all at once if you pay a small free. If you download them one by one they are free. I will also be using a few Filters, but all of them are found in Photoshop.
This is the effect I have in mind.
Here are some of the 30 Textures you can download
We will also need a free stock image. I will be using this one.
You can download it from here
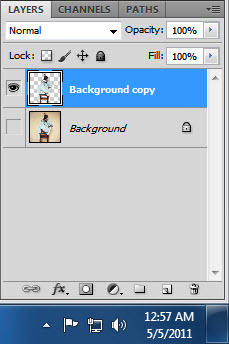
Step 1 : The first thing to be done is to cut out the figure from the background and place it on a new layer. You can use the Refine Edge
or the Magnetic Lasso
or the Pen Tool
The image looks like this.
Step 2 : Press CTRL+CLICK the New Layer icon. A new Layer 1 forms below the Background copy layer.
Step 3 : The Foreground Color should be set to the default Black.
Step 4 : Press ALT+BACKSPACE to fill with the Foreground Color which is Black in this case.
The image looks like this.
Step 5 : I have opened this Texture in Photoshop. You can download it from here
Step 6 : Press v for he Move Tool. Press Shift. Drag the Texture onto the image.
Step 7 : Zoom out. Press CTRL+T for Free Transform.
Step 8 : Drag the middle handles inward to resize the Texture. Press ENTER to apply the transformation.
Step 9 : Drag the Texture Layer (Layer 2) over the model's image (Background copy layer).
Step 10 : Press ALT and click on where the small white hand points to clip Layer 2 with Background copy layer beneath it. As soon as the layer is clipped you will find a downward pointing arrow next to the layer thumbnail on the left.
Step 11 : The image looks like this. Zoom out.
Step 12 : Click to change the Blend Mode to Hard Light.
The image looks like this.
Step 13 : Click on Layer 1.
Step 14 : I have now opened this Texture. You can download it from here
Step 15 : Press v and drag the Texture onto the image.
Step 16 : Zoom out. Press CTRL+T for Free Transform.
Step 17 : Drag corner handles inwards. Press ENTER to apply the transformation. Zoom in.
Step 18 : Click the New Layer icon. A new layer forms above the Texture Layer ( Layer3).
Step 19 : Click the bent arrow to change the Foreground Color to White.
Step 20 : Click the Gradient Tool. Click the Radial Gradient in the top panel.
Step 21 : We will be using the Foreground to Background Gradient.
Step 22 : Drag the Gradient Tool diagonally from the middle upwards as shown.
The image looks like this.
Step 23 : Change the Blend Mode to Overlay.
The image looks like this.
Step 24 : Go to Filter> Distort >Wave.
Step 25 : In the wave dialogue box I have increased the Max slider to 125. You can see the Preview at left how the effect looks. Click OK.
The image looks like this.
Step 26 : Change the Foreground Color to Black.
Step 27 : Go to Filter >Sketch>Halftone Pattern.
Step 28 : The Halftone Pattern opens. Click OK with the default settings.
The finished image.
Other photoshop tutorials are here
Subscribe to:
Post Comments (Atom)


No comments:
Post a Comment