Saturday, November 14, 2015
Washed effect with Photoshop
![](https://blogger.googleusercontent.com/img/b/R29vZ2xl/AVvXsEhf1dmp3ENRv0FUTGq1TKAeoawOBGvJkjJJeUj-FJ7xnl1_LIhWIa_RROtqeIfFKkiMsowS4mSWQZsZfThmSRq9ohV48-YXqHisksboAfEezNDsNQK8MGEhA8bRFlM3PrYAntamKjkvPCiQ/s400/snap000.jpg)
![](https://blogger.googleusercontent.com/img/b/R29vZ2xl/AVvXsEgh51t86Bb_V0SFM8iKjQkKur_UT_IRWvg-2oF9ujPH-48BdqEh0gpAKf20solSvMN37XuKrqVZ0D0DatloQ-YB5pv8T5clqDrlZM-Tzywdu8EKwudf6Ez0QXM6roXJop3-weh66DYdtg60/s400/snap001.jpg)
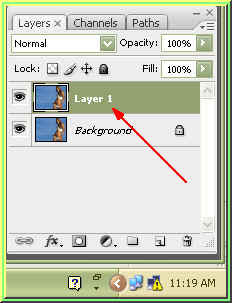
Step 2 : Press CTRL+J on the keyboard and the image will be duplicated in the Layers pallete as Layer 1.
![](https://blogger.googleusercontent.com/img/b/R29vZ2xl/AVvXsEgLGgbCDZ1aTcxYMJ9YLoz81FuMD025a3R7E_5rEfVHZ3OPs_T6OYmCmK7QO6Wp2mQHZd7h9CXschLvfzIHsbMUP2-eKPv7gMCQCja1w195Rtmmrqaw62xdk0LbCUgMc6ZAQHiNaR509HMb/s400/snap002.jpg)
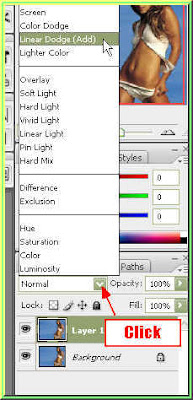
Step 3 : In the Layers pallette, change the Blend Mode to Linear Burn.
This is how the image looks.
![](https://blogger.googleusercontent.com/img/b/R29vZ2xl/AVvXsEhnfeIkia5PPPvMo1gk6GSh5Hf067USg0633yBxbOYL3kClZjF-Y9PiOaIyBXXOYUGXxJncVgQkmNAJOOjktgCWHDHJfze86VN9z7UchLAIOKOCg9RveHYvtckjO9VB0S1vzHimlbQBaPSz/s400/snap004.jpg)
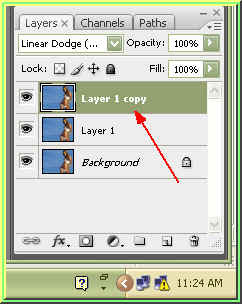
Step 4 : Press CTRL+J again. A layer 1 copy forms in the Layers pallette.
This is how the image looks.
![](https://blogger.googleusercontent.com/img/b/R29vZ2xl/AVvXsEg_lxYflYzsPl1L-YVIPWIRtzcHsIJXEBbucd_izr0bO5snlhyieDczb-zce3j7QHWHea8rPGT2kfrWJ3RxPQMKE-RWvfPYTc90ZApuGHBkXAS0bXo41lL45XcYsxDXtyuhfdJ1ajNGgzyg/s400/snap006.jpg)
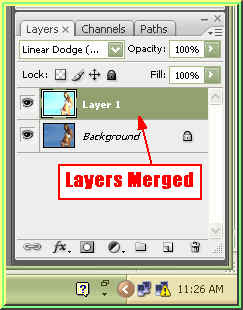
Step 5 : Press CTRL+E on the keyboard and the Layer 1 Copy merges into Layer 1. There are only two layers now in the Layers pallette -- Layer 1 and Background.
Step 6 : Press CTRL+E again. All the layers are now merged into Background.
![](https://blogger.googleusercontent.com/img/b/R29vZ2xl/AVvXsEj5X4ixAZn2bxAf30XkkuRO9xxKjDXpB0Vkou2ti_DcnoyQOUqXErm4s1CxSEuulp6gXEp21vt-0n8pmMSY18nSmwmsWJlvUoT-rA52fvrumorQIN2wpXYtIBx989iF9-Emw4O8Dxs7u2i3/s400/snap008.jpg)
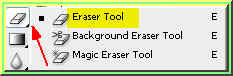
Step 7 : Click on the Erazer Tool to select it.
Step 8 : Use the Erazer Tool to wipe away the traces of background. You can make the Erazer tip bigger or smaller with theese bracket keys [ and ]. The left bracket makes the tip smaller and the right bracket makes it bigger.
The finished image. That is all.
No comments:
Post a Comment