Showing posts with label Puppet Warp Text with Photoshop CS5. Show all posts
Showing posts with label Puppet Warp Text with Photoshop CS5. Show all posts
Wednesday, November 18, 2015
Puppet Warp Text with Photoshop CS5
Photoshop CS 5
 has a brand new feature called Puppet Warp. You can warp both text and images with it. I will demonstrate how to use the Puppet Warp feature on text. It is easy to do.

Step 1 : Open a Blank White document.

Step 2 : Click the Text Tool.


Step 3 : Click in the top panel where the little white arrow points to reveal the Fonts available in Photoshop CS5. There are quite a lot of new ones.

Step 4 : I am clicking on Arial to choose the Font.

Step 5 : I have typed in 30 as the Font Size. You can set any size you want.

Step 6 : Draw out a Text Box with the Text Tool.

Step 7 : This is the Text I have typed.

Step 8 : Click the Tick mark in the top panel at right.

Step 9 : This is how the image looks.

Step 10 : Click the Move Tool.

Step 11 : Keeping SHIFT pressed drag the text down.

Step 12 : This is how the Layers palette looks like.

Step 13 : Right click the Text Layer. From the pop-up click on Convert to Smart Object.

Step 14 : This is how the Layers palette looks after conversion of the text to a Smart Object.

Step 15 : Go to Edit>Puppet Warp .
.

Step 16 : In the top panel the Mode is set to Normal, the Density to Normal and Show Mesh is ticked.

Step 17 : If Show Mesh is checked the text looks like this.

Step 18 : Look at the Density drop down. There are three options. Leave it at the default Normal.

Step 19 : Uncheck the Show Mesh.

Step 20 : Click with the cursor. Each time you click a Pin appears. I have clicked the letter M with 5 Pins.

Step 21 : Press SHIFT and drag the top Pin up as shown.

Step 22 : Release SHIFT and drag the other leg of the Pin up.

Step 23 : Now drag the right leg of the letter down,

Step 24 : I have now placed Pins on the letter y.

Step 25 : I have dragged the Pins as shown.

Step 26 : I have placed two Pins on the letter P.

Step 27 : I have dragged up the top Pin of the letter P. Note that the Pins on ' My' have greyed out.

Step 28 : I have placed Pins on the letter 'h' and dragged the top and bottom Pins up and down. This is how you go about it.

Step 29 : I have arrived at the last letter and dragged the Pins up and down. Now press ENTER.

Step 30 : This is how the Text looks.

Step 31 : Go to Window>Styles.

Step 32 : The Styles dialogue box opens.

Step 33 : Click the tiny Black arrow the White arrow points to.

Step 34 : When you click the tiny Black arrow the other Presets are revealed. I am clicking on KS Styles. It is new.

Step 35 : As soon as you click on KS Styles this dialogue box opens. Click OK.

Step 36 : These are the KS Styles.

Step 37 : I am clicking on Neon Ice. It is the name of the Style.

Step 38 : As soon as I click the Neon Ice Styles, this is how my image looks. You can use any of the Styles and Presets.

Step 39 : After use you should always Reset Styles, otherwise the last used one becomes the default.

Step 40 : Click the small double headed arrow to make the Styles dialogue box go away.

Step 41 : I am opening a free stock image from the My Pictures folder on my computer.

Step 42 : Press CTRL+A (Select All), then CTRL+V (Copy).

Step 43 : I have gone over to the image with Text and pressed CTRL+C (Copy). The image is very large and has covered my Text entirely.
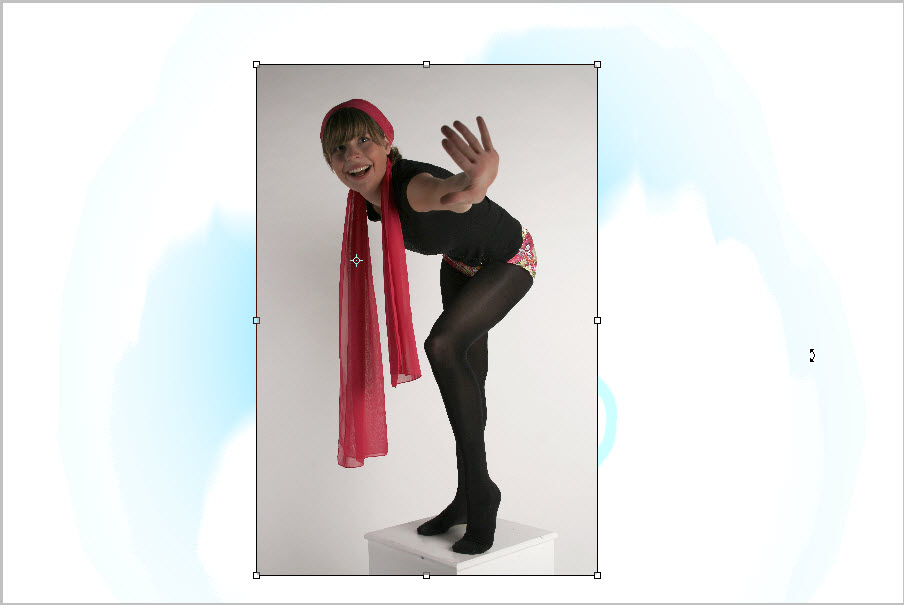
Step 44 : I have pressed CTRL+T. Then pressed SHIFT+ALT and dragged the left top corner handle down and up several times to resize the image. Press ENTER to apply the transformation.

Step 45 : I will be using good old Magnetic Lasso to cut out the image from its background.
In fact, I should have done so earlier before moving the image to the Text layer.

Step 46 : Just click a point with the Magnetic Lasso and drag all around the figure. If you place a point wrong press DELETE to remove the last point and continue.

Step 47 : The image is now selected.

Step 48 : Press CTRL+SHIFT+I to inverse the selection.

Step 49 : Press DELETE. Press CTRL+D to deselect. The Background has been removed.

Step 50 : This is how the Layers palette looks. The image of the girl is on Layer 1.

Step 51 : Drag Layer 1 to just before the Background Layer.

Step 52 : Layer 1 is now just over the Background Layer.

And here is my finished Text Puppet Warp. I will post a tutorial using the Puppet Warp on an image.
Other Photoshop tutoials arre here
Subscribe to:
Posts (Atom)