Thursday, November 26, 2015
Brightening images in Photoshop
Sometimes you may have an image which is dark, which you wish to brighten. There are many ways of doing it. Let me show you an easy way in Photoshop.
Step 1 : I have opened this free stock image in Photoshop. You can find it here
It belongs to *mjranum-stock Marcus J. Ranum
Step 2 : Press CTRL+J to duplicate the Background layer.
Step 3 : Click the Lasso Tool. Set the Feather in the top panel to 22.
Step 4 : With the Lasso Tool trace along the inside of the clothes.
Step 5 : I have completed the selection with the Lasso Tool
Step 6 : As soon as you complete the selection it turns into marching ants.\
Step 7 : Press CTRL+J. The selection is copied and pasted onto Layer 2.
Step 8 : Change the Blend Mode of Layer 2 to Screen.
This is how the image looks. Details of the clothes are clearer now.
Step 9 : Press CTRL+SHIFT+ALT+E. A new Layer 3 forms.
Step 10 : Right click Layer 3 and click on Convert to Smart Object.
Step 11 : The Layer has been changed into a Smart Object.
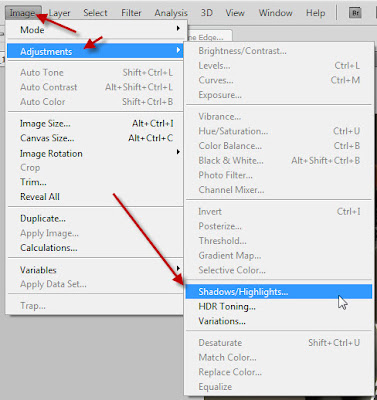
Step 12 : Go to Image>Adjustments>Shadow/Highlights.
Step 13 : When the Shadows/Highlights opens set the Amount to 30% and Radius to 50 pixel. Click OK.
The completed image.
Step 14 : Click the Mask below Layer3.
Step 15 : The Foreground Color is set to White and the Background White, instead of the other way around.
Step 16 : Press CTRL+BACKSPACE. It will fill with Background Color, which is Black in this case.
Step 16 : Press b to bring up the Brush Tool.
Step 17 : Click the top panel. In he Brush's dialogue box set the Hardness to around 35%. You can increase the size of the brush by pressing ] (right bracket) and decrease it with [ (left bracket).
The image meanwhile looks like this after filling the Mask with Black.
Step 18 : With the Brush selectively brighten parts of the image you want to. You should zoom in for this. Paint with White to uncover detail. Paint with Black to cover detail.
Step 19 : I have touched up her face and dress, but left her hair alone while painting with White. In case of a mistake switch the Foreground Color to Black and paint it out.
Other Photoshop tutorials are here
Subscribe to:
Post Comments (Atom)


No comments:
Post a Comment