Step 8 : Click the Rectangular Marquee Tool.
Step 9 : Draw out a selection after deciding which portions of the image will stick out of the frame.
Step 10 : Go to Edit>Stroke.
Step 11 : The Stroke dialogue box comes up.
Step 12 : The Color Picker comes up. Type ffffff in the box shown and click OK. The 6fs stand for white.
Step 13 I have set the Width of the Stroke to 60 pixel because this is a very high resolution image. For a low resolution image set a Width of 10 or 15 pixel. Change the Location to Inside. Click OK.
Step 14 : The Stroke is applied. A marching ants selection surrounds it.
Step 15 : Press CTRL+D to remove marching ants selection.
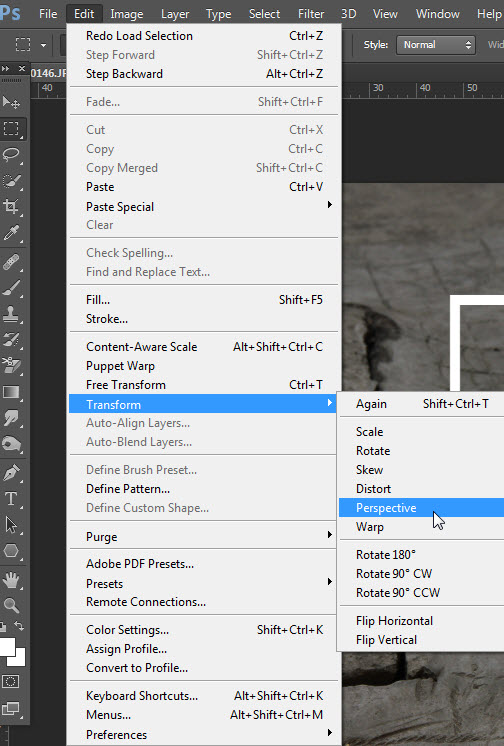
Step 16 : Go to Edit>Transform>Perspective
Step 17 : Drag the top left corner inwards. The right corner does so automatically.
Step 18 : Drag the left bottom corner outwards. The right side follows suit.
Step 19 : Click the Tick mark in the top panel or press ENTER.
Step 20 : CTRL+CLICK the layer thumbnail on Layer 2.
Step 21 : A double selection of marching ants on the white frame is visible.
Step 22 : Press CTRL+SHIFT+I to invert the selection.
Step 23 : Press 'q' on the keyboard for the Quick Mask. The white frame enters the Quick Mask mode.
Step 24 : Click the Paint Bucket Tool.
Step 25 : Click anywhere outside the frame and the Quick Mask covers the background.
Step 26 : Press q to enter normal mode. Note the marching ants selection is on the inside of frame.
Step 27 : Click on Layer 1.
Step 28 : Click the Layer Mask button. A Layer Mask forms on Layer 1.
The image looks like this.
Step 29 : Click on Layer 1 copy and click on the eye icon.
I will be using the
Quick Select Tool.
The Pen Tool or even the
Magnetic Lasso can be used to make the selection.
You can see the tutorials if you click on the links.
Step 30 : I have selected the kitten with the Quick Select Tool.
Step 31 : Go to Select>Refine Edge.
Step 32 : The Refine Edge dialogue box opens.
Step 33 : Right click where shown and click on Refine Radius Tool.
Step 34 : Check the Smart Radius. Drag to the left. Move the Smooth, Feather slightly to smooth out rough edges. Drag the Contrast slider to regain some of the edge detail. Click OK.
Step 35 : Set the Output to Selection. Click OK.
The kitten has been selected.
Step 36 : Click the Layer Mask button. A Layer Mask forms on Layer 1 copy.
The image looks like this.
Step 37 : With Layer 1 copy highlighted., press SHIFT and click on Layer 1.
All three layers are highlighted.
Step 38 : Right click on the highlighted layers and from the pop up menu click on Convert to Smart Object.
The three layers are converted into a Smart Object.
Step 39 : Press CTRL+T. A selection forms.
Step 40 : Right click inside and click on Warp.
Step 41 : Drag the handles at the middle down.
Step 42 : Drag the middle handles up.
Step 43 : Click the Tick Mark in the top panel.
Step 44 : Click on The Background Layer.
Step 45 : Click the Foreground Color. The Color Picker opens. Hover the cursor outside on the image it changes to an eye dropper.
Step 46 : I am clicking on a Dark Shade. Click OK.
Step 47 : Click on the Background Color. Again the Color Picker comes up.
Step 48 : I am now clicking on a light shade. Click OK.
The Foreground and Background Colors are the ones chosen.
Step 49 : Click the Gradient Tool.
Step 50 : Click the Foreground to Background Gradient Preset.
Step 51 : Press SHIFT. Drag with the Gradient Tool from bottom to top.
The image looks like this.
Step 52 : Click on Layer 1 copy.
Step 53 : Use the Move Tool to reposition the out of bounds
Step 54 : Click the FX icon at the bottom of the Layers pallete and click on Drop Shadow.
Step 55 : Keeping the Blending Options open drag the cursor and you will be able to move the Drop Shadow.
I have moved the Drop Shadow to the left t match the natural shadow.
Step 56 : I am lowering the Opacity of the Shadow so that it does not look too dark. I have lowered it to 25%.
The completed image.
You can add any texture above the Background Layer, change the Blend Mode to Soft Light and lower the Opacity to around 25-30% for greater effect.
Other photoshop tutorial are
here This is the effect to be created.
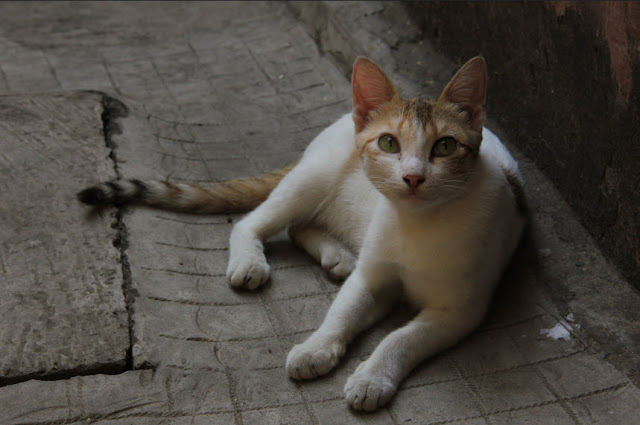


No comments:
Post a Comment