Friday, November 13, 2015
Desaturating Skin
Sometimes the skin tones may not be to your liking. It may be too dark, or too bright. You can use this trick in Photoshop to desaturate the skin tone to a tolerable level. The great thing about this is that it will only affect the skin tone and not the rest of the image. Also no Masking or complicated selections are required. This can be done in any version of Photoshop.
Step 1 : I have opened this free stock image in photoshop.
We are aiming for this effect. Note that except for the skin tones, the rest of the image -- dress or the background has not been affected.
We are aiming for this effect. Note that except for the skin tones, the rest of the image -- dress or the background has not been affected.
Step 2 : There is only the Background Layer.
Step 3 : Click the Elliptical Marquee Tool.
Step 4 : Draw out a circular selection. If you want to draw a perfect circle, keep SHIFT pressed while dragging with the Elliptical Marquee. Here drawing a perfect circle is not required.
Step 5 : Go to Layer>New Fill Layer>Solid Color
Step 6 : This dialogue box opens. Click OK.
Step 7 : The Pick a Solid Color dialogue box opens. Type in ff7300 at the box highlighted in the bottom. It is a shade of Orange. Click OK.
Step 8 : The circle is filled with the Orange.
Step 9 : The Color Fill 1 layer sits over the background layer.
Step 10 : Go to Layer>New Adjustment Layer>Hue/Saturation.
This dialogue box opens. Click OK.
Step 11 : The Hue/Saturation 1 layer sits on top of the layers.
Step 12 : In the Hue/Saturation change the Master to Reds.
Step 13 : Click the Eyedropper Tool.
Step 14 : Click with the Eyedropper Tool on the circle of Orange.
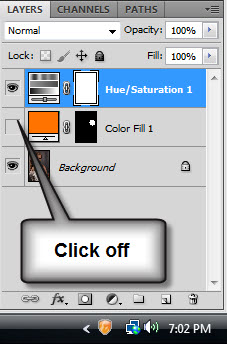
Step 15 : Click off the eye icon on Color Fill 1.
Step 16 : I have dragged the Saturation slider to -65 and the Lightness slider to 35. There is nothing hard and fast about it. It will depend on your image.
The skin tone has been desaturated to an extent so that the garish tone no longer remains. Notice that the dress and the background is unaffected.
Step 17 : You can save the changes made to the image as a preset.
Click where the arrow points to.
Step 18 : Click on Save Hue/Saturation Preset.
Step 19 : This dialogue box opens for saving as a preset. I have named the preset as Desaturated Skin Tone.
Click Save.
Step 20 : I have opened this free stock image now.
Step 21 : Click the New Fill or Adjustment layer button. Click on Hue/Saturation.
Step 22 : The Hue/Saturation comes up.
Step 23 : Change Default to Desaturated Skin Tone which now appears at the bottom.
This is the original image.
The skin tone only has been desaturated, nothing else in the image has changed.
That is all.
Other Photoshop tutorials are here
Labels:
Desaturating Skin
Subscribe to:
Post Comments (Atom)


No comments:
Post a Comment