Friday, November 6, 2015
Dripping effect
Let us create a drip effect in Photoshop. It will also be a part sketch, part real effect. I will show how you can do it easily. First we need a free stock image. You will also learn some Photoshop secrets on the way. Best of all in can be done in all versions of Photoshop.
Step 1 : I will be using this free stock image. You will find it here
Step 2 : Press CTRL+J t duplicate the Background Layer.
Step 3 : Go to Filter>Stylize>Find Edges.
The image looks like this.
Step 4 : Go to Image>Adjustments>Threshold.
Step 5 : The image loses color. The Threshold dialogue box opens.
Step 6 : Drag the Threshold to the right or left for the effect you want and click OK. I have set the Threshold level for this image at 185.
The image looks like this.
Step 7 : Click the Rectangular Marquee.
Step 8 : Drag out a section with the Rectangular Marquee.
Step 9 : Press ALT and click the Layer Mask button. A Layer Mask forms next to the layer thumbnail on Layer 1.
The image looks like this.
Step 10 : Click the Brush Tool.
Step 11 : Click in the top panel to open the controls. I have set the Size very small at 10 and the Hardness at 60%.
Step 12 : The Foreground/Background colors should be set to the default Black/White.
Step 13 : Press SHIFT and drag straight down with the Brush.
Step 14 : Let go of SHIFT. Click again, hold down SHIFT and drag down with the Brush. This is how you must go about it.
Step 15 : Follow the same procedure to draw the rest of the drips with the Brush.
Step 16 : The hard black dot in the top panel indicates a Hard Brush is being used. I have pressed the ] (right square bracket key) to increase the size of the Brush to 90.
Step 17 : Draw with the Brush to remove the hard edge of the selection drawn earlier.
Step 18 : Press the [ (left square bracket) a number of times to make the Brush small to add a drip. Click at the tip of the perpendicular lines and gently drag it down or up so that the blobs do not stay circular.
Step 19 : Zoom into the image and correct the blobs so that they look like drips.
The drips have been created.
Step 20 : CTRL+CLICK the Layer Mask.
A selection forms
Step 21: Press CTRL+SHIFT+I to inverse the selection.
Step 22: With the selection in place, click the New Layer icon. A new Layer 2 forms.
Step 23 : Press CTRL+BACKSPACE. This fills with the Background color which is White. Press CTRL+D to deselect.
Step 24 : Click the Layer Styles button. Click on Bevel and Emboss.
Step 25 : In the Bevel and Emboss dialogue box I have set the Style at Inner Bevel, Technique to Smooth,
dragged the Size slider to 15 and soften to 9. Click OK.
The image looks like this. Though the drips look good the bevel effect on the right does not.
We will fix that.
Step 26 : Lower to Fill of layer 2 to 0
The White disappears. The image looks like this. Notice that the bevel on the edges are more pronounced.
Step 27 : Right click the Effects under Layer 2. Click on Create Layers from the popup.
The Layers have been created. I am still on Layer 2.
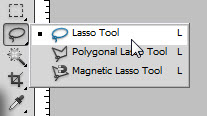
Step 28 : Click the Lasso Tool.
Step 29 : Make a selection of the bevelled edge.
A selection forms.
Step 30 : Press DELETE> The bevelled edge disappears. Press CTRL+D to deselect.
Step 31 : Now draw a selection at the top with the Lasso.
Step 32 : A selection forms. Press DELETE. The bevelled edge goes away. Press CTRL+D to deselect.
Step 33 : Draw a selection with the Lasso for the edge at the right. Press DELETE. Press CTRL+D to deselect.
The Bevelled edge at the top disappears, while that below remains.
.That is all.
Other Photoshop tutorials are here
Labels:
Dripping effect
Subscribe to:
Post Comments (Atom)


No comments:
Post a Comment