Monday, November 23, 2015
Pop art effect
Creating pop art with any image is easy and fun to do. All you need is an image. In fact, any will do. You can also do it in any version of Photoshop.
This is the pop art I will create.
We will be using this free stock image for the tutorial. You will find it here
It belongs to NerySoul
Step 1 : Press CTRL+J to duplicate the Background Layer to Layer1.
Step 2 : Press CTRL+I to invert the image.
Step 3 : The image looks like this.
Step 4 : Go to Filter>Blur>Gaussian Blur.
Step 5 : The Gaussian Blur dialogue box comes up. See the preview and blur till you can still see details. It will depend on your image. I have given a Radius of 3.7 as this is a low resolution image. If you use a high resolution image you will have to set a higher Radius. Click OK.
Step 6 : Change the Blend Mode to Color Dodge.
The image looks like this.
Step 7 : Click the Add New Fill or Adjustment Layer button. Click on Curves.
.Step 8 : In the Curves dialogue box click on the middle of the diagonal which represents the highlights. Drag down slightly.
The image now has slightly more detail.
Step 9 : Click the New Layer icon. A new Layer 2 forms. Change the Blend Mode of the Layer to Multiply.
Step 10 : I have clicked on Pastel Yellow Orange in the Swatches.
The Foreground Color changes to the Color picked.
Step 11 : Press ALT+BACKSPACE to fill with the Foreground Color. The image looks like this.
Step 12 : Rename the Layer as Skin. Double click the Layer to type in Skin.
Step 13 : Click on the Background layer.
Step 14 : Press CTRL+J to duplicate the Background Layer. The Background copy layer forms.
Step 15 : Drag the Background copy layer right to the top.
Step 16 : In the Swatches I have clicked on Darker Warm Brown.
The foreground Color changes to the color picked.
Step 17 : Go to Filter>Sketch>Halftone Pattern.
Step 18 : In the controls of the Halftone Pattern I have set 2 for the Size and 15 for Contrast. This will vary from image to image. Make sure that you set a small amount for the Size and a large amount for the Contrast. Pattern Type is set to Dot. Click OK.
The image looks like this.
Step 19 : Change the Blend Mode to Multiply.
The image looks like this.
Step 20 : Rename the layer hair.
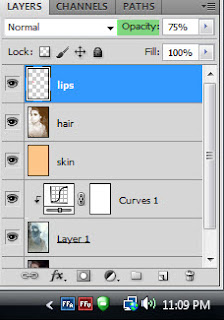
Step 21 : Click the New Layer icon. A new Layer 2 forms. Rename it lips.
Step 22 : I have clicked on CYMK Red in the Swatches.
Step 23 : Click off the eye icons of the hair, skin, Curves 1 layer and Layer 1.
The original image is visible again.
Step 24 : Zoom in on the lips.
Step 25 : Click the Brush Too. At the top set the Mode to Color and Opacity to 30%.
I have painted the lips. I have gone over it thrice with the Brush.
Step 26 : Turn back the eye icons of the layers. Reduce the Opacity of the Lips layer to 75%.
The image looks like this.
Step 27 : Click on the New layer icon. Rename the new layer eye.
Step 28 : Press x and then d on the keyboard to restore the default Foreground/Background Color. Then press x again to change the Foreground Color to White.
Step 29 : In the top panel increase the Opacity to 70%.
Step 30 : Paint with the Brush on the white of the eye.
Step 31 : Paint with White on the other eye.
Step 32 : Make another new layer and rename it Iris.
Step 33 : I have clicked on Pure Cyan an in the Swatches.
Step 34 : Change the Opacity of the Brush to 50% in the top panel.
Step 35 : Paint the irises.
Step 36 : Now for the finishing touches. I have lowered the Opacity of the eye layer to 68%.
Step 37 : I am changing the Blend Mode of the hair layer to Hard Light.
Step 38 : I am lowering the Opacity of the iris layer to 54%.
Step 39 : I am lowering the Opacity of the lips layer to 50%.
The finished pop art.
Other photoshop tutorials are here
Labels:
Pop art effect
Subscribe to:
Post Comments (Atom)


No comments:
Post a Comment