Tuesday, November 3, 2015
Smart Filter again
Let us see what can be done with a free stock image or for that matter any image, a couple of layers and some filters found in photoshop can be done. We will be using Smart Filters again.
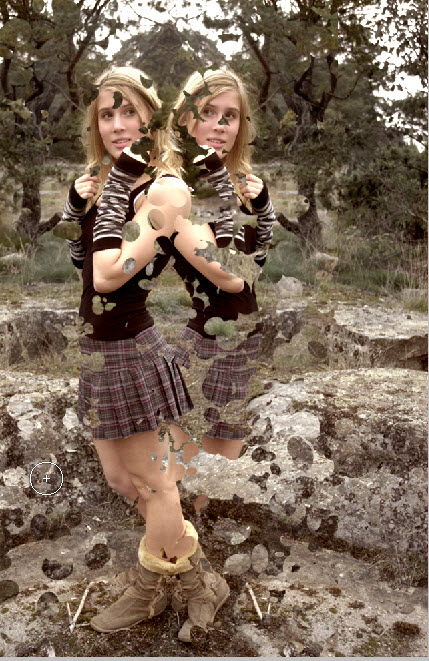
This is the effect to be achieved.
Step 1 : I will be using this free stock image. You will find it here
It belongs to bippla
Step 2 : Drag the lock of the Background layer to the Trash can at the bottom of the layers palette.
Step 3 : The Background Layer becomes Layer 0. Press CTRL+J to duplicate Layer0 to Layer0 copy.
Step 4 : Press CTRL+T. A selection forms.
Step 5 : Right click inside the selection. From the pop up menu click on Flip Horizontal.
Step 6 : Lower the Opacity of Layer0 copy to around 50%.
Now you can make out both the images overlapping each other.
Step 7 : Press v on the keyboard which is the shortcut for the Move Tool and drag the image to the left. Since we are on Layer0 copy it is the one which is moved.
Step 8 : Restore the Opacity to 100%.
Step 9 : Press ENTER. The selection goes away. The images overlap each other.
Step 10 : Click the Add Layer Mask button. A layer mask forms next to Layer0 copy thumbnail.
Step 11 : The Foreground/Background colors should be set to Black/White. If it is not press x and then d on the keyboard to restore the default setting.
Step 12 : Click the Brush Tool.
Step 13 : Click where the arrow points to reveal the Brush controls. Click on the first hard round brush.
Step 14 : Click on the icon at the right to bring up more Brush Controls. Click on Brush Tip Shape. Drag the Spacing slider to around 150.
Step 15 : Click on Shape Dynamics. Accept the default settings. It means you do nothing else.
Step 16 : Click on Scattering. Accept the default settings. Just make sure that Both Axes of Scatter are checked and that the slider is around the midway point.
Step 17 : Click the tiny double arrows to make the panel go away.
Step 18 : Place the Brush tip on the image. Press [ (left bracket key) to make the brush smaller still and the ] (right bracket key) to make it larger. Remember the shortcut.
Step 19 : Drag randomly with the Brush. You will get this effect. Note my Brush is at the top right now.
Step 20 : Vary the size of the Brush and continue painting. I have actually made the Brush smaller and smaller after painting bits and pieces.
Step 21 : I have made the Brush larger by pressing ] key and continued painting removing the the edge of the layer which showed the division between the two image on the top and bottom layers (layer0 copy and layer0).
Step 22 : Now switch the Foreground Color to White by clicking on the bent arrow or pressing x on the keyboard.
Step 23 : Now paint over the image again and the image looks like this.
Step 24 : Click on Layer0.
Step 25 : Press CTRL+CLICK the New Layer icon. A new Layer 1 forms under Layer0.
Step 26 : make sure the Background Color is set to Black.
Step 27 : Press ALT+ BACKSPACE to fill Layer 1 with the Foreground Color which is Black.
Step 28 : Click on Layer0.
Step 29 : Click on the Add Layer Mask button. A Layer Mask forms next to Layer0.
Step 30 : Click the Brush Tool again.
Step 31 : Varying the size of the Brush paint around the image. You will get something like this.
Step 32 : Switch the Foreground Color to White.
Step 33 : Paint again over the Black spots they will appear to fragment.
Step 34 : Click on Layer0 copy.
Step 35 : Press SHIFT and click on Layer 1. All the layers are highlighted.
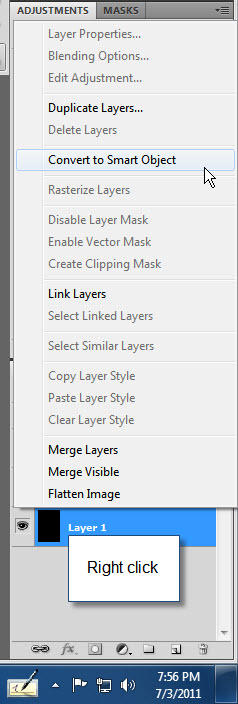
Step 36 : Right click and from the pop up click on Convert to Smart Object.
Step 37 : The layers are converted to a Smart Object.
Step 38 : Click on Image>Adjustments>Variations.
Step 39 : In the Variations Click on More Green. Click OK.
Step 40 : The image looks like this.
Step 41 : Double click the Blending Options icon.
Step 42 : The Blending Options of the Variations (which is now a Smart Filter) opens. The Mode is set to Normal and Opacity at 100%.
Step 43 : I have left the Blend Mode at Normal and reduced the Opacity to 60%. Click OK.
The image looks like this.
Step 44 : Press CTRL+J. A new Layer0 copy 2 forms.
Step 45 : Go to Filter>Distort>Twirl.
Step 46 : I have set the Angle in the Twirl settings at 200. Click OK.
The image looks like this after applying the Twirl filter.
Step 47 : Double click the Blending Options icon.
Step 48 : Change the Blend Mode to Hard Light and reduce the Opacity to 50%. Click OK.
The finished image. Other photoshop tutorials are here
Labels:
Smart Filter again
Subscribe to:
Post Comments (Atom)


No comments:
Post a Comment