Monday, November 30, 2015
Embossed Reusable Signature in Photoshop
If you want to sign your digital work you can add a custom signature. You first have to create it in Photoshop. I will show how you can create a custom signature step by step.
Step 1 : Press CTRL+N. This will open this dialogue box for a new layer. I have chosen the Preset as 'Default Photoshop Size' and 'Background Contents' as Transparent. Click OK.
Step 2 : In the Layers palette you will find only a single layer -- Layer 1. Click the New Layer icon the red arrow points to.
A new Layer 2 forms above Layer 1.
Step 3 : From the fly out click on Rounded Rectangle Tool. You can see where you will find it.
Step 4 : With the Rounded Rectangle draw out a rounded rectangle as above.
This is how the Layers palette looks like. A Shape 1 forms over Layer1.
Step 5 : Right click the Shape 1 layer. From the pop up click on Rasterize Layer.
Step 6 : You will notice no difference in the image. Look at the Layers palette. Shape 1 has been Rasterized. Click directly on the layer thumbnail of Shape 1 layer.
Notice that as soon as you click the thumbnail of Shape 1 layer a selection forms around the Black rounded rectangle.
Step 7 : Click directly on the Foreground Color. This will bring up the Color Picker. The column of color in the middle is called the Spectrum. There are tiny sliders at its bottom. Drag it up till you get a brownish color. Then click a shade in the box at the left. If you want to use the same color as I am using type 634d18 in the green highlighted box. You will get the same color as I have chosen. You can use any color of course. Click OK after selecting a shade.
The Foreground Color changes to the color picked.
Step 8 : The selection is still in place around the rounded rectangle. Press ALT+BACKSPACE. The rounded rectangle fills with the Foreground Color which has been selected.
Step 9 : Go to Select.Modify>Contract.
Step 10 : In the Contract Selection dialogue box set 10 pixels and click OK.
The selection contracts by 10 pixel.
Step 11 : Go to Select>Modify>Border.
Step 12 : In the Border Selection dialogue box set the Width at 12 pixels. Click OK.
The Border selection immediately becomes visible.
Step 13 : In the Layers palette click on the New Layers icon and a new Layer 2 forms above Shape 1 layer. Press ALT+BACKSPACE. Then press CTRL+D to deselect.
Step 14 : Click on the Add Layer Style button and click on Bevel and Emboss from the pop up.
Step 15 : In the Bevel and Emboss dialogue box click the 'Anti-aliased'. Click the Gloss counter and select Gaussian from the drop down. It is the one the red arrow points to. Increase the Size to 10 pixel.
This is how the image looks.
Step 16 : Click on the Type Tool and then on the Horizontal Type Tool.
Step 17 : At the right on top select the Font from the drop down in top panel (red arrow). Select the Font Size. You can type in the size (orange arrow).
Step 18 : Draw out a Text Box with the Text Tool by dragging.
You can set the Color of the font from this small square in the top panel. It works in the same way as the Color Picker. The Color is set to the Foreground Color.
Step 19 : Type out your Text. I have typed in 'Made in Brazil. You don't see it because the color of the font is the same as the background color.
Step 20 : Click the Tick mark in the top panel.
Look in the Layers palette. You will find the Text on the top layer.
Step 21 : Right click the Text Layer and click on 'Rasterize Text'.
Step 22 : After the Text is rasterized. CTRL+Click the layer thumbnail of the text layer.
Step 23 : As soon as CTRL+click you will notice an outline of marching ants around the Text. This step is not necessary, since the Text Color is already set. Press Ctrl+D to deselect.
Step 24 : Click on Layer 2. right click and from the pop up click on Copy Layer Style.
Step 25 : Click on the layer above Layer 2. Right click and click on Paste Layer Style.
The Text is now visible.
Step 26 : Click on the Shape 1 layer.
Step 27 : Click on the Move Tool. Press CTRL+A. The image will be selected by a column of marching ants.
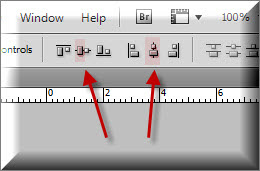
Step 28 : Now click the second and fifth icons on the top panel.
Step 29 : Click on Layer 2 and follow exactly the same thing. Click the Move Tool and click the second and fifth icons in the top panel.
Step 30 : Click on the top Layer. Again click the Move Tool, then the second and fifth icons in the top panel.
Step 31 : Press CTRL+D to deselect and there is your embossed signature. It is also perfectly aligned.
Step 32 : Go to File>Save As
Step 33 : Save anywhere in your computer as a psd file. You can give it a name before saving.
You can add the Embossed Signature to any of your photos.
That is all. Wishing everyone a Happy New Year.
Other photoshop tutorials are here.
Subscribe to:
Post Comments (Atom)


No comments:
Post a Comment