Saturday, November 28, 2015
Polka Dots in any version of Photoshop
I had demonstrated how Polka Dots can be created in Photoshop CS4. The tutorial is here. But you can create Polka Dots in other versions of Photoshop as well quite easily.
Step 1 : Open a new White Layer in Photoshop.
Step 2 : Click the Add New Layer button and a new layer -- Layer 1 forms.
Step 3 Click the Brush Tool.
Step 4 : Click where the red arrow points to in the top panel to reveal the Brush controls. Select Brush 19 which is a Hard Brush.
Step 5 : It does not matter what you set for the Master Diameter. The Hardness of this Brush is set to 100 %. It means that it it a hard brush.
Step 6 : Make sure that your Foreground is set to Black and Background To White.
Step 7 : Now click once with the Brush Tool on the extreme left top of the White Layer. Then press SHIFT and click on the extreme right side. Photoshop automatically creates the rest of the dots.
The dots have been created.
Step 8 : Look in the top panel. The Brush size is 70.
Step 9 : Now press the [ (left bracket next to the letter P on your keyboard) till the Brush Size decreases to 50. This is a shortcut to make the Brush tip smaller.
Step 10 : Click on the Foreground Color.
Step 11 : As soon as you click on the Foreground Color, the Color Picker pops up. I have clicked on a shade of gray in the left panel.Note that 'new' at the top changes to the same shade. The numerical value of the shade is given in the box at the bottom.
Note that the Foreground Color has also changed to the shade picked.
Step 12 : Click once with the Brush Tool.
Step 13 : Now click once on the extreme right with the Brush Tool. Photoshop immediately creates the rest of the dots.
Step 14 : Now make the Brush tip large. Press the ] (right bracket key next to the letter P on your keyboard) to make the Brush size larger. It will increase every time you press it.
Step 15 : Now click on the Foreground Color. This will bring up the Color Picker. Note that there is a small slider on the column of color in the middle which can be dragged up or down to change the color. The column of color is called the Spectrum. I have chosen a shade of pink for the next dot. I have click on the left panel. Note that 'new' at the top changes to the color picked. The numerical value appears in the box at the bottom.
The Foreground Color also changes to the color picked.
Step 16 : Click the Brush Tool.
Step 17 : Increase the Brush size to 70 by pressing on the ] (right bracket).
Step 18 : Click once on the left of the canvas with Brush Tool.
Step 19 : Press SHIFT and click on the extreme right. Photoshop creates the remaining dots for you. This is how you go on adding the dots in different colors.
And, there are the polka dots.
Step 20 ; Click on the Elliptical Marquee Tool.
Step 21 : Press Shift and draw out a circle with the Elliptical marquee. You will be able to draw a perfect circle. Note that the circle is not in the middle.
Step 22 : Place your cursor in the middle of the circle and drag it to the middle.
Step 23 : Press CTRL+SHIFT+I to inverse the selection. The selection inverses.
Step 24 : Press DELETE.
Step 25 : Press CTRL+SHIFT+I. The selection inverses again.
Step 26 : Go to Filter>Distort>Spherize.
Step 27 : The Spherize dialogue opens. Drag the Amount slider to 50 %. Click OK.
Step 28 : After you click OK, the Spherize effect is applied. If you want to apply it again press CTRL+F. I have not done so, as this effect is satisfactory for me. That's how you can make a Polka dot. You can also make the design created into a Brush for later use. Press CTRL+D to deselect.
Step 29 : Go to Edit>Define Brush Preset.
Step 30 : This dialogou box pops up. I have named it polka dots. I have just typed it in.
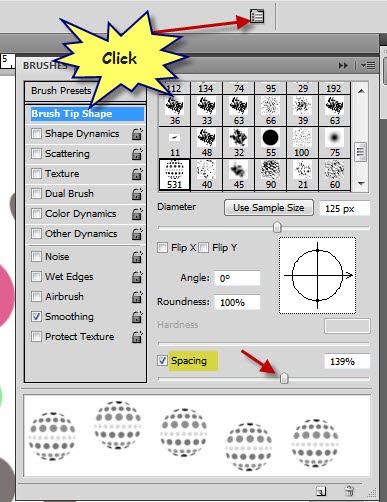
Step 31 : Click where the arrow points to in the top panel. Click on the Brush Tip Space, then drag the Spacing slider till the dots separate.
Step 32 : In the left top panel click where the red arrow points to, to reveal the Brushes pallette. You will find the Polka Dots Brush at the end. It is Brush no 531.
Step 33 : Click on Add Layer icon in the Layers pallete and a new Layer 2 forms above Layer 1.
Step 34 : Click once with the Brush Tool on the left top corner.
Step 35 : Click the icon in th top right panel to reveal the Brushes pallette. Click on the Brush Tip Shape. The drag the Spacing slider suitably till the polka dots are separated.
Step 36 : Press Shift and click on the right hand size of the canvas and Photoshop completes the rest of the polka dots.
And that's how you create a polka dot design.
Subscribe to:
Post Comments (Atom)


No comments:
Post a Comment