Sunday, November 8, 2015
Adjustment Layers and Solid Color
Adjustment Layers allow you to make adjustments non-destructively to images. They are powerful things with which you can add effects. Some prefer a single color tone, though other colors also show through. This can be done with Adjustment Layers.
I have chosen this free stock image. You will find it here
It belongs to stylaholic
This is the effect I will create. I have added a greenish tinge. You can use any color. I will show you how.
You can see from where you can access the Adjustment Layers.
These are the Adjustment Layers that you can use.
Step 1 : Click on Curves.
The Curves dialogue box opens.
Step 2 : Click on the Eyedropper Tool
Step 3 : I have pressed CTRL and clicked with the Eyedropper Tool on the pupil of the eye.
As soon as you click you will find a dot on the diagonal in the Curves. Use the ARROW KEYS to move the dot up or down instead of the cursor. Watch the image as you press the arrow keys.
Step 4 : I have pressed the UP ARROW key 8 times. I am satisfied with the effect. Pressing 8 times is not the rule. It only creates the effect I want.
The image looks like this.
To see the difference the Adjustment Layer has made ALT+CLICK the eye icon on the Background Layer.
Step 5 : Next press CTRL+SHIFT+ALT+E. This will make a composite Layer1.
Step 6 : Go to Image>Adjustments>Shadow/Highlights.
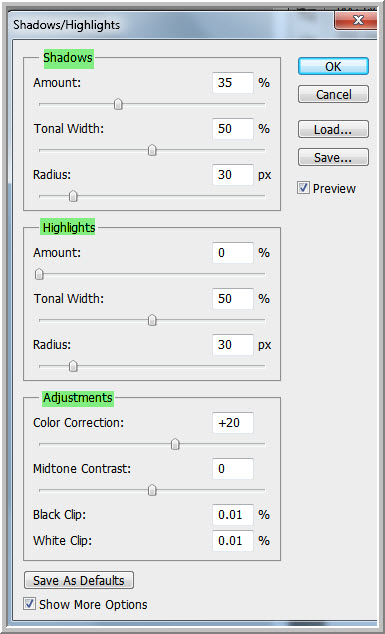
The Shadow/Highlights dialogue opens. Check the Show More Options.
Now you can see all the Options. These are the default options. When applied, the default options make an immediate improvement in the image. There are three broad categories -- Shadows, Highlights and lastly Adjustments. Shadows and Highlights each have Tonal Width and Radius. Instead of dragging the sliders of Amount, Tonal Width and Amount, increase the Amount and Tonal Width in increments of 5 or 10. Then do the same for the Radius or leave it alone. It will depend on the image.
As I said there is an immediate improvement in the image.
Step 7 : I have moved the Amount slider to 45 from 35, the Tonal Width to 60 from 50 and decreased the Radius from 30 to 10.
Step 8 : In the Highlights, I am moving the Amount slider to 10. The more you increase the Amount, the darker the image will be. I am not using the other controls. Click OK to exit the Shadow/Highlights.
The image looks like this.
ALT+CLICK the eye icon in the Background layer to see difference.
Step 9 : Now click on Solid Color Adjustment.
Step 10 : The Color Picker opens. Note the sliders at the bottom of the column of color known as the Spectrum. You can move the sliders up or down to change the color in the left panel.
Step 11 : I have moved the slider to the Green and then click a dark shade. You can choose any color.
Click OK.
Step 12 : Change the Blend Mode.
To Soft light.
The image looks like this. You might be happy with it.
Step 13 : Or press 8 on the keyboard to reduce the Opacity to 80%.
Here is the final image.
Other photoshop tutorials are here
Subscribe to:
Post Comments (Atom)


No comments:
Post a Comment