Saturday, November 7, 2015
Comic Book effect with Photoshop CS
Let's turn a photo to a comic book look in Photoshop CS. It's quite easy and you will be able to do it too.
Step 1 : I have opened this free stock image in Photoshop. Open any image. If you use a high resolution image it will be better. This is a high resolution image.
Step 2 : Press CTRL+J to duplicate the Background Layer. A New Layer 1 forms.
Step 3 : Go to Edit>Blur Surface Blur.
Step 4 : The Surface Blur dialogue box opens. Drag the Radius to 20 and Threshold to 15. Click OK.
Step 5 : Again press CTRL+J. This duplicates Layer 1 into Layer 1 copy.
Step 6 : Press CTRL+SHIFT+U. This is a shortcut to desaturate the image.
Step 7 : Click the Channels pallete to open it. CTRL+Click the layer thumbnail of the RGB channel at the top.
Step 8 : As soon as you CTRL+Click a selection appears on the image.
Step 9 : Switch back to the Layers pallete. Click the New Layer icon in the Layers pallete. A new layer forms above Layer 1 copy. The new layer is Layer 2.
Step 10 : Press SHIFT+CTRL+I to inverse the selection.
Step 11 : Make sure the Foreground Color is set to Black. By default it is. If it is not press 'x' and then 'd' on your keyboard.
Step 12 : Press ALT+BACKSPACE to fill with the Foreground Color which is Black. My photo looks like this. Press CTRL+D to deselect.
The Layers pallete looks like this.
Step 13 : Turn off the eye icons on the top two layers and click on the layer below it.
The layer below is Layer 1.
Step 14 : Since you have turned off the eye icons in the top two layer the layer below i.e. Layer 1 contains the color image. Color also returns to the image.
Step 15 : Go to Filter>Artistic>Cutout.
Step 16 : In the Cutout dialogue box change the Number of Levels to 8, Edge Simplicity to 0 and Edge Fidelity to 3.
This is how my image looks after clicking OK in the Cutout dialogue box.
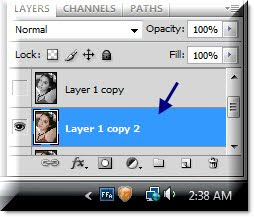
Step 17 : Press CTRL+J. Layer 1 duplicates into Layer 1 copy 2.
Step 18 : Click where the arrow points to, to bring up the Blend Modes and click on Soft Light.
This is how my image looks.
Step 19 : Click on Layer 1 copy and turn on the eye icon.
Step 20 : go to Filter>Artistic>Poster Edges.
Step 21 : In the Poster Edges dialogue in the controls on the right keep the Edge Thickness, Edge Intensity and Posterization all at 1. Click OK.
This is the effect I have got.
Step 22 : Change the Blend Mode of this layer to Multiply.
This is how the image looks like now. A trifle dark.
Step 23 : Press CTRL+L. The Levels dialogue box comes up. You can drag the white slider at the left or type in a value in the highlighted box. I have typed in 150. Click OK.
The image brightens.
Step 24 : Click on Layer 2 i.e. the topmost layer and switch on the eye icon.
Step 25 : CTRL+Click on the layer thumbnail on Layer 2.
A selection forms immediately.
Step 26 : Click on the Add Layer Mask button and a layer mask forms next to the layer thumbnail on Layer 2. The selection around the image also disappears.
Step 27 : Go to Filter>Pixelate>Color Halftone.
Step 28 : In the Color Halftone dialogue box change the Max radius to 15 from the default 8. Click OK.
And here is what my image looks like.
Step 29 : Now click on the Layer mask and press CTRL+I.
And this is how my image looks.
Step 30 : Change the Blend Mode to Overlay.
And, there is my finished comic book effect. That was not difficult was it?
Other Photoshop tutorials are here.
Subscribe to:
Post Comments (Atom)


No comments:
Post a Comment