Sunday, November 8, 2015
Luminosity Masking for Skin smoothing
I have shown Luminosity Masking before and I will show it again. But what in heaven does 'luminosity masking' do? Well, for one it softens the skin. It brings the colors in an image to life. And, the technique works for just about any image once you have got the hang of it. You can also do this in any version of Photoshop.
I will be using this free stock image. You will find it here
It belongs to liquid-venus-stock
This is the effect I will achieve. You can make out the difference in the two images.
Step 1 : Click the Color Sampler Tool. Some people hate to use this tool, because they don't know how to remove the numbers it leaves behind.
Step 2 : I have clicked thrice with the Color Sampler -- 1 for the White point, 2 for the Grey point and 3 for the Black point. How you place the points will depend on the image you use.
Step 3 : Add a Levels Adjustment Layer.
Step 4 : Click the White eyedropper.
Step 5 : Click with the White eyedropper on the first point i.e. the White point. You should immediately notice a difference in tone.
Step 6 : Click the Gray eyedropper.
Step 7 : Click on the second point i.e. the Grey point.
Step 8 : Click the Black eyedropper.
Step 9 : Click on the Black point.
Step 10 : Click the Color Sampler again. Look in the top panel. You will find a 'Clear' button. Click it will make the numbers go away.
Step11 : ALT+CLICK to see the 'Before' an 'After'.
The image looks like this. Compare it with the original to see the difference.
Step 12 : Click on the Background Layer.
Step 13 : Press CTRL+J to make a Background copy layer.
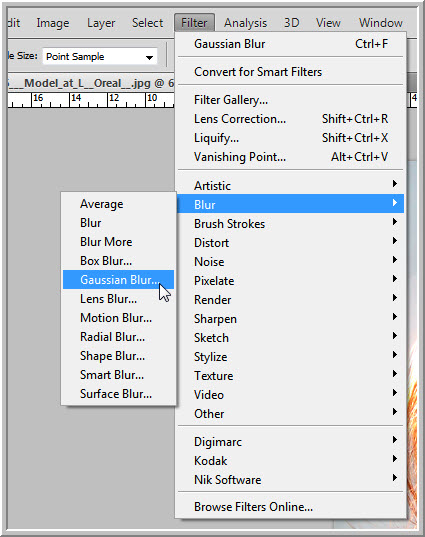
Step 14 : Go to Filter>Blur>Gaussian Blur.
Step 15 : In the Gaussian Blur dialogue set the Radius such that only the details are faintly visible.
This is how the image looks with the Gaussian Blur. This will give you an idea how much to blur.
Step 16 : Click off the eye icon of the Background copy layer.
Step 17 : Go over to the Channels palette.
Step 18 : Click the Red, Green and Blue channels in turn.
Step 19 : The Red, Green and Blue channels look like this. Look for the channel where the skin looks the softest. It will usually be the Red channel.
Step 20 : CTRL+CLICK the thumbnail on the Red channel.
A selection of marching ants appear as soon as you CTRL+CLICK.
Step 21 : Click back in the Layers panel. Click on the eye icon on the background copy with the selection still in place.
The image look like this.
Step 22 : Click the Layer mask button. A layer mask forms on Background copy layer.
The image looks like this. The skin has smoothed out, but so also all details like, eyes, lips and hair.
The Foreground/Background colors should be set to the default Black/White.
Step 23 : Press b for the Brush Tool. To make the brush small press [ (left square bracket) and to make it large ] (right square bracket). To make it soft press SHIFT+[ and to make it hard SHIFT+].
We will use a soft brush. Vary the size as you paint.
Step 24 : In the top panel let the Mode remain at Normal, set the Opacity and Flow to 50%.
Step 25 : Since you are painting at 50% Opacity and Flow, make a number of passes with the Brush over the eyes and eyelids to bring back details.
Step 26 : Make the Brush small and paint the eyebrows.
Step 27 : Paint the lips and teeth.
Step 28 : The nostrils.
Step 29 : Lastly paint the hair and the clothes. That is all.
Other photoshop tutorials are here
Subscribe to:
Post Comments (Atom)


No comments:
Post a Comment